
How to Convert SVG to PNG on Windows Without Uploading It
Convert SVG artwork to PNG locally on Windows while checking output dimensions, transparency, fonts, and rasterization limits.
On this page
- Quick answer
- SVG and PNG solve different problems
- When converting to PNG makes sense
- Inspect the SVG before converting
- Step-by-step: convert SVG to PNG in LocalFlux
- Tested result
- Choosing a transparent or solid background
- Text and font fidelity
- Common mistakes
- Batch conversion strategy
- Privacy and offline notes
- Troubleshooting
- Final checklist
- Publication evidence
- Practical checks before and after conversion
- Related local workflows
SVG is ideal when an illustration, icon, logo, or diagram needs to scale cleanly. It describes vector shapes and text rather than storing a fixed grid of pixels. PNG does the opposite: it stores a raster image with a specific width and height.
Converting SVG to PNG is therefore not just changing a file extension. You are choosing a fixed pixel rendering of a scalable source. The correct output depends on where the PNG will be used, how large it will appear, whether the SVG relies on fonts or external assets, and whether transparency must remain intact.
This guide shows a local Windows workflow with LocalFlux. The SVG is rendered on the PC through a bundled conversion component during normal supported conversion, so it does not need to be uploaded to a website.
Quick answer
To convert SVG to PNG on Windows without uploading it:
- Open LocalFlux and add the SVG.
- Keep Convert selected.
- Choose PNG as the output format.
- Open Options and set suitable pixel dimensions if the source does not already define the size you need.
- Keep aspect ratio locked unless distortion is intentional.
- Convert, then inspect the PNG at 100% and over the intended background.
LocalFlux writes a new PNG and leaves the SVG unchanged during normal conversion.
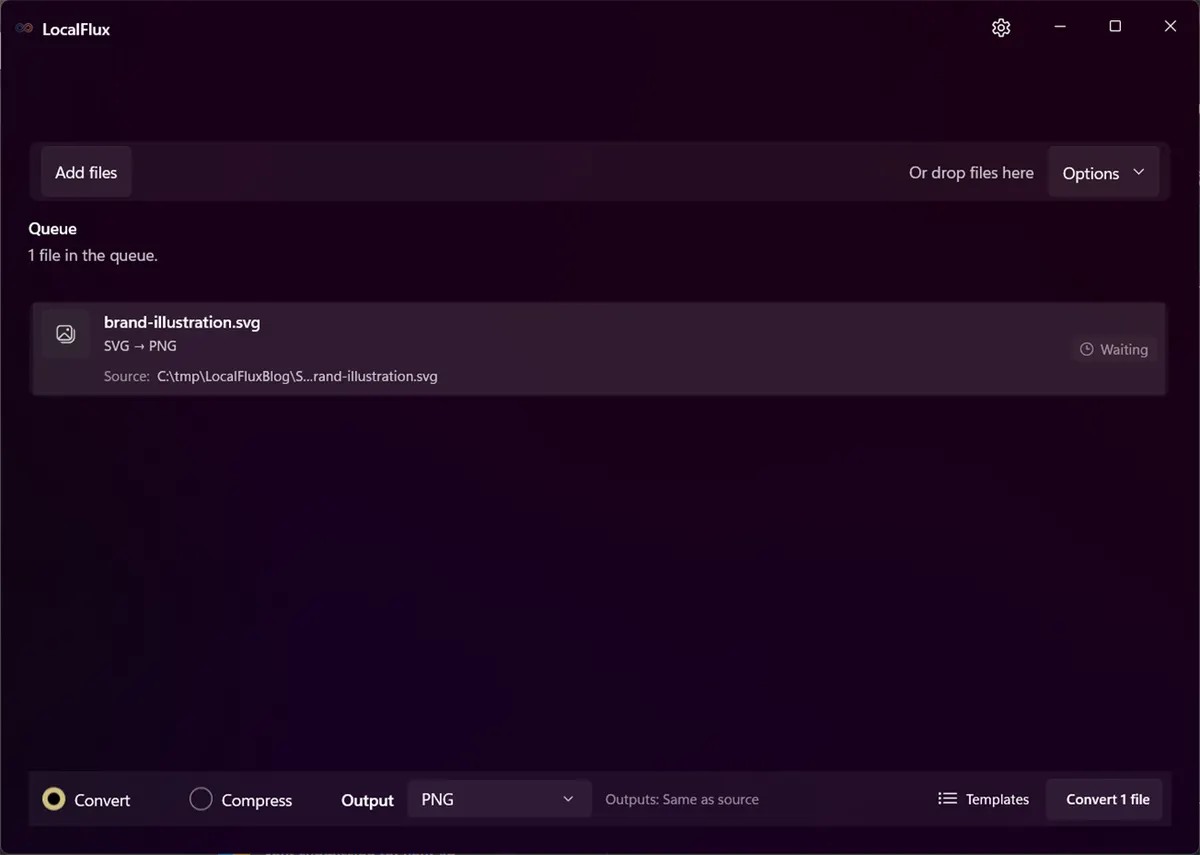
The privacy-safe SVG fixture is ready to be rasterized as PNG.
SVG and PNG solve different problems
An SVG can describe paths, fills, strokes, gradients, clipping, filters, text, embedded images, and other graphics using XML. Because much of that content is geometric, a renderer can draw it at different sizes without the blockiness associated with enlarging a bitmap.
A PNG contains a fixed matrix of pixels. It supports lossless pixel storage and alpha transparency, which makes it useful for screenshots, interface assets, and systems that do not accept SVG. It cannot be enlarged indefinitely without becoming soft or pixelated.
The W3C SVG specification explains that the outer svg element’s width, height, and viewBox contribute to the image’s intrinsic dimensions and aspect ratio. SVG is inherently scalable, but a raster output needs a concrete size. See SVG 2 sizing.
That is the central decision in this conversion: how many pixels should represent the vector artwork?
When converting to PNG makes sense
Create a PNG copy when:
- a CMS, marketplace, document system, or messaging tool rejects SVG;
- an app or game pipeline expects raster assets;
- you need a fixed preview or thumbnail;
- the destination blocks active SVG content for security reasons;
- a print or office workflow renders the SVG inconsistently;
- you need to freeze a specific appearance for review.
Keep SVG when the destination supports it and scalable geometry is valuable. For web icons and logos, SVG may remain the smaller and sharper delivery asset. Converting every SVG to PNG by habit can increase file size and remove editability.
Inspect the SVG before converting
SVG files are not all self-contained. Before conversion, check whether the file depends on:
- fonts installed on the current PC;
- linked raster images;
- CSS loaded from another location;
- external references;
- scripts or interactive behavior;
- unsupported filters or blend modes;
- a missing width, height, or
viewBox; - editor-specific features.
A browser may resolve a web font or network image that an offline converter cannot access. A local rendering can therefore differ even when the SVG opens correctly on the website where it was created.
For a stable conversion, embed required raster assets, convert critical text to paths when licensing and editability allow it, and define a sensible viewBox plus dimensions or aspect ratio.
Step-by-step: convert SVG to PNG in LocalFlux
1. Add the SVG
Open LocalFlux, select Add files, and choose the SVG. Drag and drop is also available. The queue should show the filename and detected SVG type.
Use only SVGs you trust. SVG is XML and can include references or active features. LocalFlux’s supported conversion route is local, but a broadly capable renderer still has to interpret the file. Avoid opening untrusted vector files merely because they have an image extension.
2. Select PNG output
Keep Convert selected, then choose PNG from the output list. Confirm that the row shows SVG -> PNG and is ready.
The test fixture for this article defines a 200 x 200 canvas, so the default output retained those dimensions.
3. Choose raster dimensions
Open Options when the default size is not the size you need. Think in final physical pixels:
- A graphic displayed at 400 CSS pixels may need an 800-pixel PNG for a 2x high-density screen.
- A 64-pixel app icon should usually be rendered specifically for that size rather than downscaled by an unknown downstream tool.
- A print workflow needs enough pixels for the intended physical size and resolution.
Keep aspect ratio locked to avoid stretching circles into ovals or distorting a logo. If the SVG has a viewBox but no absolute width or height, choose dimensions explicitly and verify the result.
When you need several sizes, render separate derivatives from the SVG master. Do not repeatedly resize an already rasterized PNG.
4. Convert locally
Select Convert 1 file. LocalFlux renders the vector content and writes a PNG copy with a safe output name.
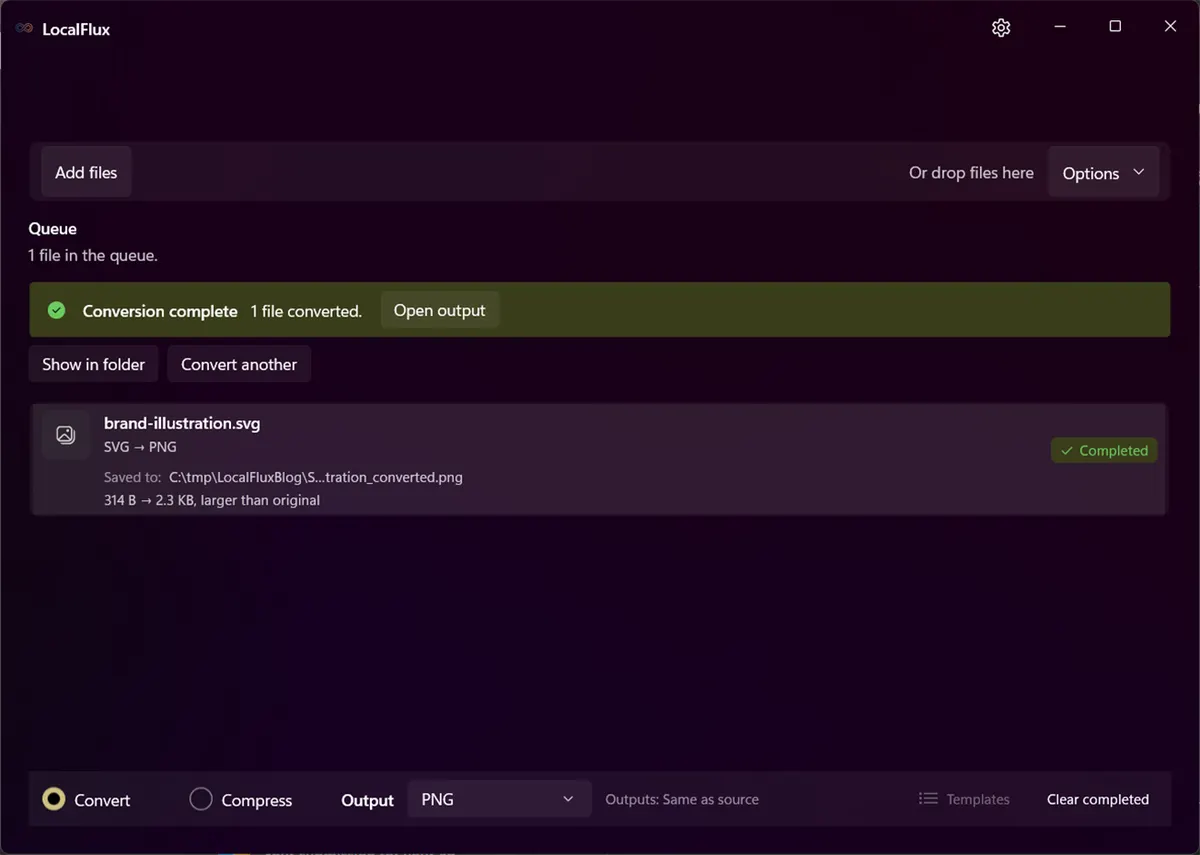
The completed output is brand-illustration_converted.png; the original SVG remains beside it.
5. Inspect the PNG
Open the PNG in the actual destination when possible. Review it at 100%, not only as a scaled preview.
Check:
- width and height;
- aspect ratio;
- transparent background and edge pixels;
- font appearance and line wrapping;
- stroke thickness;
- gradients and filters;
- embedded images;
- clipping at the canvas boundary;
- color appearance;
- file size.
Place a transparent output over both light and dark backgrounds. A white logo on transparency can look blank in a white image viewer even when the pixels are correct.
Tested result
The synthetic fixture used for this article is a small, self-contained SVG with a defined 200 x 200 canvas. LocalFlux 1.0.7.0 produced the following result on Windows x64:
| Observation | SVG source | PNG output |
|---|---|---|
| Dimensions | 200 x 200 | 200 x 200 |
| File size | 314 bytes | 2,385 bytes |
| Alpha-capable channels reported | yes | yes |
| Output name | brand-illustration.svg | brand-illustration_converted.png |
The PNG is larger than the SVG. That is reasonable: the vector source describes simple geometry very efficiently, while the PNG stores 40,000 pixel positions. The conversion was performed for compatibility, not compression.
This fixture does not establish behavior for external images, web fonts, scripts, complex filters, animations, or every SVG feature. Those need separate representative tests before publication or batch migration.
Choosing a transparent or solid background
PNG supports alpha transparency, and a vector with no painted background can render to transparent pixels. Whether that is desirable depends on the destination.
Keep transparency for logos, overlays, icons, and assets that must work over different backgrounds. Use a solid background when the target system flattens transparency unpredictably or when the artwork includes light elements that would disappear against a default white canvas.
LocalFlux converts the artwork; it is not a compositing editor with a background-color picker. If you need a particular matte color, set it in the SVG before conversion or use an image editor after creating the PNG.
Text and font fidelity
SVG text can reference a font family without embedding the font. If that font is not installed, the renderer substitutes another font. Substitution can change character widths, line breaks, alignment, and even whether labels fit inside shapes.
For brand artwork or diagrams where text placement is critical:
- Confirm the required font is installed and licensed for the workflow.
- Render a sample on the actual conversion machine.
- Compare the PNG with an approved reference.
- Consider converting text to vector outlines in the source authoring tool when future text editing is not required.
Outlining text changes accessibility and editability, so keep the original editable SVG.
Common mistakes
Renaming .svg to .png
That leaves XML/vector content inside a misleading filename. A valid PNG begins with PNG binary data and must be produced by rasterization.
Accepting an arbitrary default size
A renderer needs dimensions. If the SVG does not define a useful intrinsic size, the default may be wrong for your use. Set the intended output size explicitly.
Upscaling the PNG later
Return to the SVG and render a larger derivative instead. Enlarging the PNG cannot recover vector sharpness.
Ignoring transparent margins
The artwork may occupy only part of its viewBox. The output dimensions can be correct while the visible graphic looks unexpectedly small. Adjust the SVG canvas in a vector editor if you need a tighter crop; LocalFlux does not provide a crop tool.
Assuming browser appearance is universal
Browsers, design tools, office suites, and conversion engines can differ on fonts, filters, CSS, and external resources. Verify the renderer used in production.
Batch conversion strategy
For a set of icons or diagrams, group only assets that should use the same output policy. One selected output format applies to the compatible batch, and common dimensions may not suit a mix of icons, posters, and wide diagrams.
Test at least one sample from each SVG source family or authoring tool. Compare output dimensions, alpha, fonts, filters, and file size. If a single SVG renders differently, isolate it rather than assuming the rest of the batch is safe.
Privacy and offline notes
Unpublished logos, product diagrams, organization charts, and client artwork may be inappropriate for an upload-based converter. LocalFlux processes this supported route on the PC during normal conversion and can work offline after installation.
Local processing does not automatically sanitize the content. SVG can contain document titles, comments, editor metadata, IDs, links, or external references. The PNG freezes visible pixels, but you should still review both source and output according to your publishing policy.
LocalFlux does not require sign-in for conversion and keeps the original by writing a separate output copy. It is a converter, not a vector editor, SVG sanitizer, or security scanner.
Troubleshooting
The PNG is blank. Check whether the artwork is white on transparency, outside the viewBox, dependent on external resources, or using unsupported features.
The size is wrong. Inspect the SVG’s width, height, and viewBox, then set explicit output dimensions with aspect ratio locked.
Text moved. Install the required font or convert approved text to outlines in the vector source.
Edges look soft. Render at the exact required pixel size or an intentional high-density multiple. Avoid arbitrary scaling in the destination.
The PNG is larger. That is normal for simple vector art. Convert for compatibility, not because raster output is guaranteed to be smaller.
Final checklist
- The PNG has the correct pixel dimensions.
- Aspect ratio is preserved.
- Transparency was checked over contrasting backgrounds.
- Fonts and embedded assets rendered correctly.
- Nothing is clipped by the SVG canvas.
- The destination accepts PNG and displays it at the intended size.
- The original SVG remains available as the editable master.
- The source and screenshot paths contain no personal information.
For repeat local image conversion on Windows, get LocalFlux from the Microsoft Store. Keep a vector editor in the workflow for canvas, path, font, and background changes; use LocalFlux to create the tested raster copy without an upload step.
Publication evidence
The files used in this article are synthetic and privacy-reviewed. You can inspect the published source and converted output in the sample folder, along with the test record and SHA-256 media manifest:
Practical checks before and after conversion
The reliable workflow is to choose the final pixel canvas; verify viewBox, embedded fonts, external resources, filters, background, transparency, and sharpness at display size. This matters because changing a file extension does not preserve every property of the source. Decide what the destination actually needs, keep the source as the master, and use a small representative file before processing a large batch.
Before you start
- Record the source format and the properties that matter to the destination.
- Choose settings for the intended viewer, editor, device, or upload system.
- Use a new output folder and keep collision-safe names.
- Open the result in the software that will actually receive it.
- Compare content, dimensions or duration, and any metadata you expected to keep or remove.
Review the output
A successful status only confirms that an output was written. It does not prove that every font, frame, channel, page, formula, profile, tag, or accessibility feature survived. For important work, inspect representative outputs and retain the original until the delivered copy has been accepted.
A successful status only confirms that an output was written. It does not prove that every font, frame, channel, page, formula, profile, tag, or accessibility feature survived. For important work, inspect representative outputs and retain the original until the delivered copy has been accepted.
The reliable workflow is to choose the final pixel canvas; verify viewBox, embedded fonts, external resources, filters, background, transparency, and sharpness at display size. This matters because changing a file extension does not preserve every property of the source. Decide what the destination actually needs, keep the source as the master, and use a small representative file before processing a large batch.
Related local workflows
Continue with How to Convert PNG to ICO on Windows 11 Without Uploading It when that file or delivery requirement appears in the same project.