
How to Compress a Large Video on Windows Without Uploading It
A large video can be awkward to email, share in chat, or archive. If the footage is private, or if you simply do not want to wait for an upload, you can compress it directly on your Windows PC.
For this walkthrough, we compressed a synthetic 12-second, 1080p MP4 with LocalFlux. The file went from 17.3 MB to 9.8 MB, a 43% reduction, using the Balanced preset. The output kept the original 1920 × 1080 dimensions, and the source file remained untouched.
Test result, not a guarantee: Compression savings depend on the source video’s bitrate, codec, motion, duration, resolution, and prior compression. Your result may be different.
Get LocalFlux from the Microsoft Store
When local video compression makes sense
This workflow is a good fit when you want to:
- reduce an MP4, MOV, or WebM before sharing it;
- keep client, family, product, or internal footage on your PC;
- work without waiting for a browser upload and download;
- compress several compatible videos with the same preset; or
- keep the original file and create a separate, smaller copy.
It is not the right tool when you need timeline editing, cuts, captions, transitions, or a full creative export workflow. Use a video editor for those jobs. It is also worth remembering that re-encoding is normally lossy: a smaller file is produced by discarding some information, even when the difference is hard to notice.
What determines a video’s file size?
A video’s size is not controlled by resolution alone. The main factors are:
- Duration: a longer recording contains more video and audio data.
- Bitrate: more bits per second usually means a larger file and potentially more retained detail.
- Resolution: 4K has many more pixels than 1080p or 720p.
- Codec and encoder settings: two files with the same duration and resolution can have very different sizes.
- Frame rate and audio: more frames per second and higher audio bitrates add data.
- The source: an efficiently encoded source may have little room left to shrink without visible quality loss.
This is why a compression app cannot promise one universal percentage. It has to balance size, dimensions, compatibility, and visual quality for the file in front of it.
Before you start
This walkthrough used the following controlled setup:
| Item | Tested value |
|---|---|
| App | LocalFlux 1.0.6.0, local x64 test build |
| Windows workflow | Compress → Balanced → Same format as input |
| Source | Synthetic MP4; no personal footage |
| Source video | H.264, 1920 × 1080, 30 fps |
| Source audio | AAC-LC, 48 kHz, mono |
| Source duration | 12.00 seconds |
| Source size | 18,180,873 bytes (shown as 17.3 MB in the app) |
We used a deliberately high-bitrate synthetic test pattern so the change would be measurable and reproducible. A phone recording, screen capture, or previously compressed download will behave differently.
How to compress a video on Windows with LocalFlux
1. Add the video
Open LocalFlux, choose Compress, and add your file. You can drag it into the window or use Add files. The app reads the file and shows its size, dimensions, and readiness before processing.
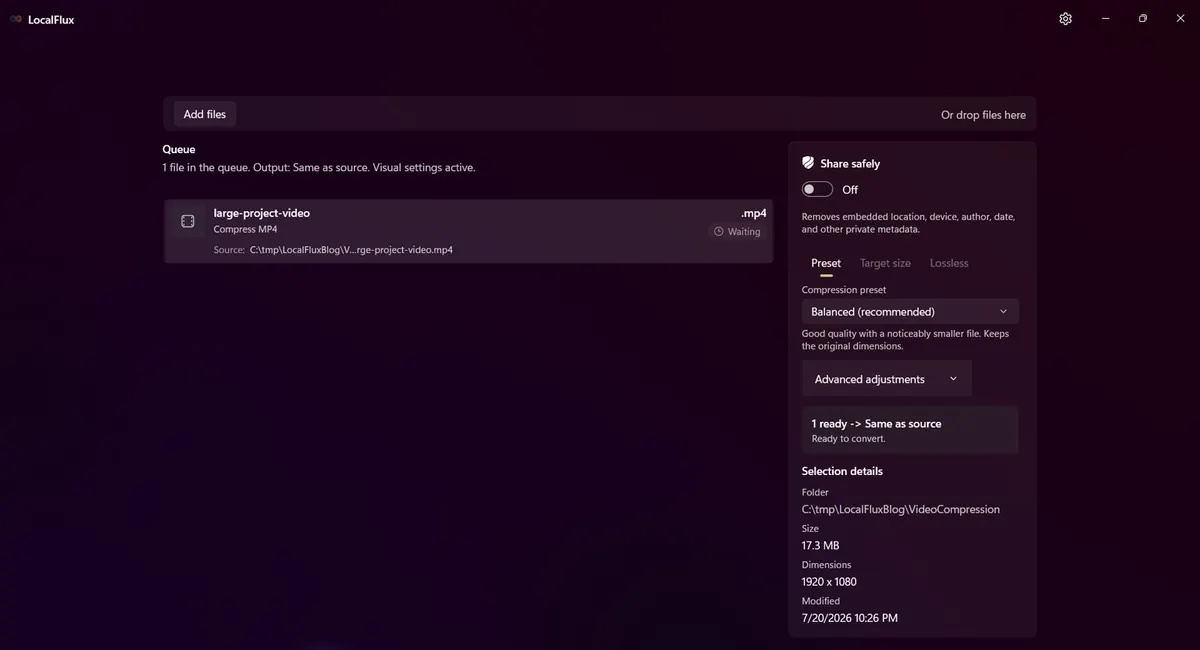
The synthetic source is ready in Compress mode. The only visible folder is the neutral test path under C:\tmp.
For this MP4 workflow, LocalFlux creates a new output file rather than replacing the source.
2. Choose a compression preset
Open the preset menu. The available choices are:
| Preset | Best used for | Trade-off |
|---|---|---|
| Best quality | Footage where fidelity matters most | More modest savings |
| Balanced (recommended) | Everyday sharing, email, and storage | A practical middle ground |
| Smallest | When transfer size matters most | May reduce dimensions and show more quality loss |
| Custom | When you want to make advanced adjustments | Requires more decisions |
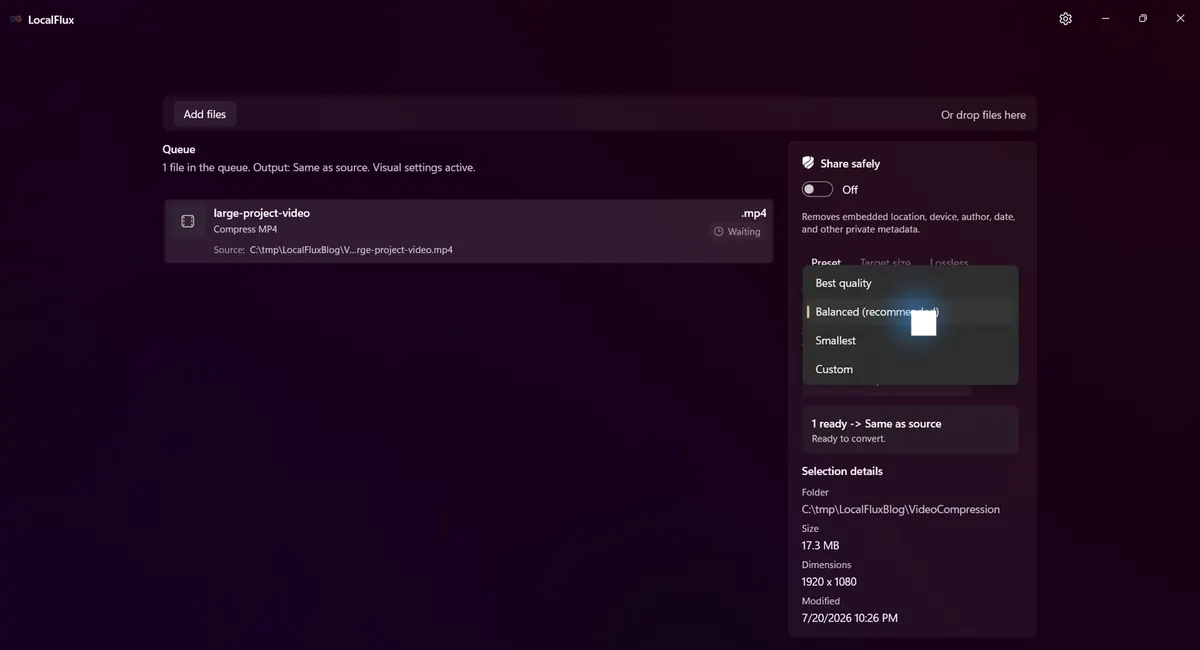
Balanced is the sensible starting point when you do not yet know how aggressively to compress.
In this test, Target size and Lossless were unavailable for the selected MP4 compression route. That is expected: use the enabled presets for this workflow rather than assuming every compression method applies to every format.
3. Check the dimensions and output format
With Balanced selected, the advanced panel showed the original 1920 × 1080 dimensions and kept the aspect ratio locked. The output format was set to Same format as input, so this MP4 produced another MP4.
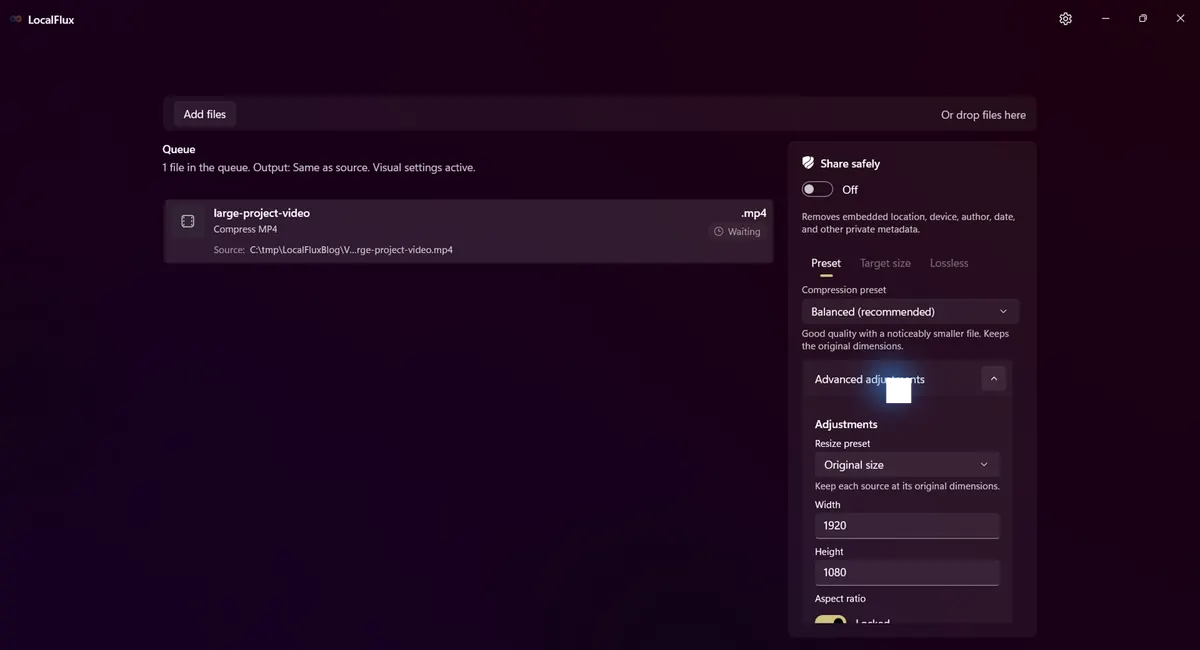
Balanced retained the source dimensions for this fixture. The Smallest preset may reduce them when appropriate.
If you need to preserve 4K or a specific frame size, check these values before starting. If the destination only needs a smaller preview, lowering the dimensions can save considerably more space.
4. Start compression
Choose Start. LocalFlux processes the video locally and writes a separate file to the chosen destination. In this test, the output name was:
large-project-video_compressed.mp4
The original large-project-video.mp4 was still present and byte-identical after the job.
5. Review the result
When processing completes, LocalFlux displays the original and output sizes and the percentage saved.
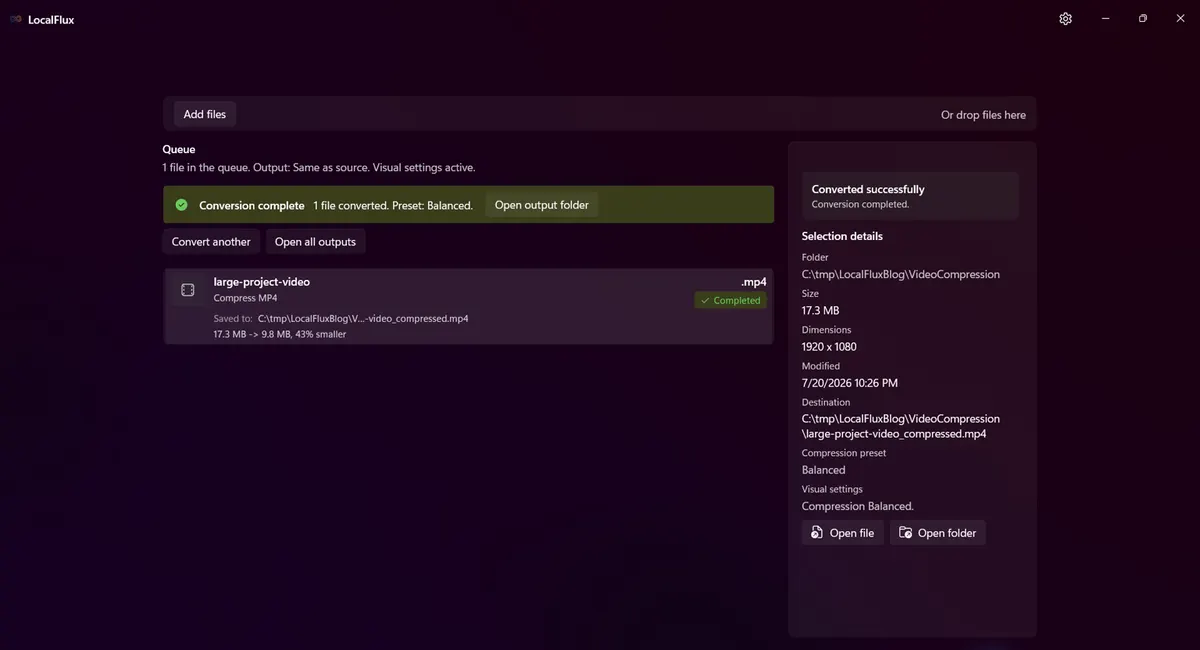
Measured result for this fixture: 17.3 MB to 9.8 MB, or 43% smaller in the app.
Here are the precise values gathered from the files:
| Measurement | Source | Balanced output |
|---|---|---|
| File size | 18,180,873 bytes | 10,319,778 bytes |
| Reduction | Not applicable | 7,861,095 bytes (43.24%) |
| Duration | 12.00 s | 12.01 s |
| Overall bitrate | 12,120 kb/s | 6,874 kb/s |
| Dimensions | 1920 × 1080 | 1920 × 1080 |
| Video | H.264, yuv420p | H.264, yuv420p |
| Audio | AAC-LC, 48 kHz mono | AAC-LC, 48 kHz mono |
The output’s lower bitrate accounts for most of the saving. Keeping the same pixel dimensions does not mean the encoded files contain the same amount of data.
You can inspect the rights-cleared synthetic source MP4 and the actual Balanced output used for this result.
Compare a frame before and after
These frames were extracted at the six-second mark from the actual source and the actual Balanced output.
| Source | Balanced output |
|---|---|
 |  |
The synthetic pattern remains visually close at normal viewing size. As a technical cross-check, a full-video SSIM comparison returned 0.988607 overall (where 1.0 is identical under that metric). SSIM is useful evidence for this controlled fixture, but it is not a promise that every source will look the same or that viewers will prefer every result. Always inspect important footage yourself, especially faces, text, gradients, fast motion, and dark scenes.
Watch the 12-second workflow
Video transcript: A synthetic 17.3 MB MP4 is ready in LocalFlux with Compress mode and Balanced selected. Compression starts, the progress view appears, and the completed result reports a 9.8 MB output that is 43% smaller. All visible file paths are under C:\tmp\LocalFluxBlog\VideoCompression.
Compress several videos in one batch
You can add multiple compatible files and apply the same workflow and preset to all of them. That is useful for a folder of meeting recordings, product demos, or camera clips that share the same destination requirements.
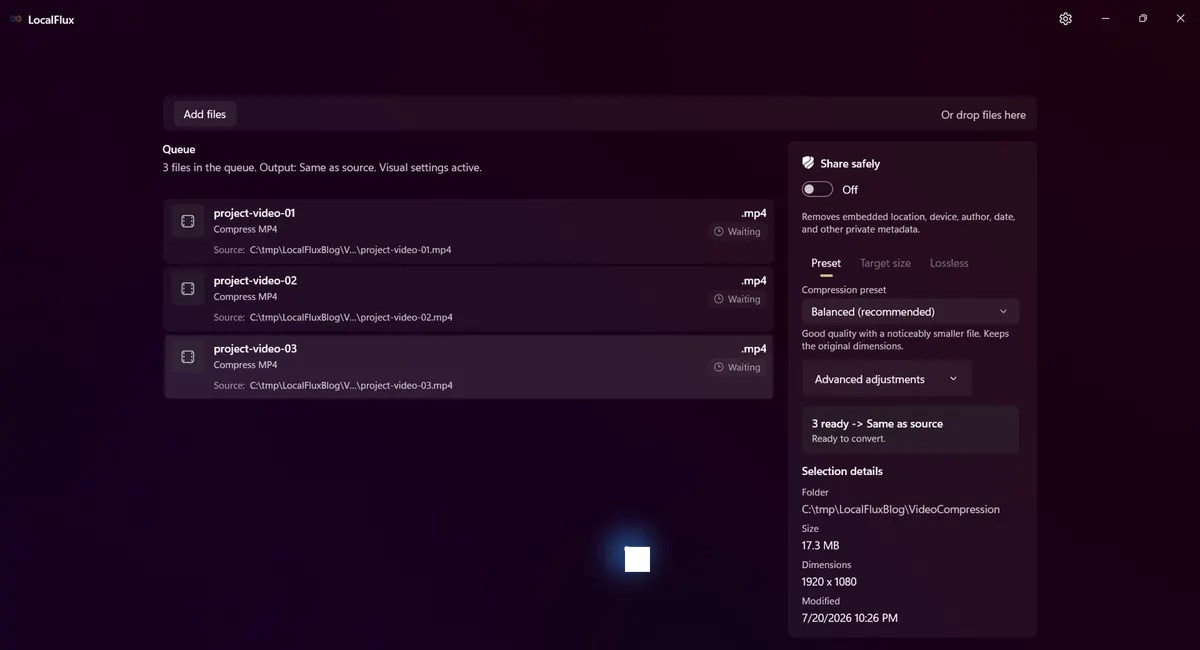
Three synthetic MP4 files are ready to use the same Balanced preset and output format.
Before starting a large batch, test one representative file. Review its text, motion, sound, and file size. Once the result is acceptable, apply the same settings to the rest. This small test can prevent an entire batch from being too large or too aggressively compressed.
How to choose the right compression level
Start with the destination, not the preset name:
- Email or messaging: find the platform’s attachment limit, then use Balanced and check whether the result fits. Try Smallest only if necessary.
- Cloud sharing: Balanced can shorten transfer time while keeping full dimensions in many cases.
- A review copy: smaller dimensions may be acceptable if recipients only need to see the content.
- An archive or master: keep the original. A compressed derivative should not be your only copy of irreplaceable footage.
- On-screen text: favor Best quality or Balanced and inspect small lettering at 100% scale.
If the first result is still too large, try a more aggressive preset or Custom settings. If it looks too soft or shows artifacts, move toward Best quality. Compression is an iterative choice, not a one-click guarantee.
What about Clipchamp?
Windows users can also export a video from Microsoft Clipchamp. Microsoft’s current documentation says Clipchamp exports MP4 video at 480p, 720p, 1080p, and 4K where appropriate. Microsoft also explains that output size varies with frame rate, bitrate, resolution, duration, and codecs; an export can even be larger than its source. See Exporting and saving a video in Clipchamp and Why your output video file may be larger than the original.
Use Clipchamp when you also need editing and a project timeline. Use a focused compressor when the job is simply to add files, choose a size-versus-quality preset, and create smaller copies.
Frequently asked questions
Can I compress a video without uploading it?
Yes. A local desktop workflow processes the file on your PC. For the workflow tested here, LocalFlux did not require the video to be uploaded to a web service.
Does compressing a video reduce quality?
Usually, yes, at least technically. Lossy video compression removes information to reduce size. A well-chosen setting may make the difference difficult to notice, but you should review the result rather than assume it is visually identical.
Will compression lower the resolution?
Not always. The Balanced result in this test remained 1920 × 1080. More aggressive settings may reduce dimensions, and Custom settings can change them deliberately.
Why is my compressed file not much smaller?
The source may already use an efficient codec or a low bitrate. Short videos, static scenes, and previously compressed downloads may have less redundant data to remove. Try a more aggressive setting, lower the dimensions, or decide whether the remaining saving is worth another lossy encode.
Is the original video overwritten?
It was not in this test. LocalFlux created a new file with _compressed in the name, while the source remained unchanged. Still, keep backups of irreplaceable media and confirm the destination before running a large batch.
Make a smaller copy without sending the footage away
For a straightforward Windows compression job, the process is simple: add the video, start with Balanced, confirm the dimensions and format, run the job, and review the output. The tested file became 43% smaller while retaining its 1080p dimensions, and every processing step stayed on the Windows PC.
Compress videos locally with LocalFlux
Related local workflows
Continue with How to Convert MP4 to GIF on Windows Offline when that file or delivery requirement appears in the same project.