
How to Convert and Compress a Video on Windows Without Uploading It
Learn when to convert, compress, or do both locally on Windows, with real LocalFlux screenshots, a short video, and measured MOV-to-MP4 results.
On this page
- The short answer
- Convert, compress, both, or neither?
- Why conversion may not reduce the file size
- Test setup
- Stage 1: convert MOV to MP4
- Stage 2: compress the converted MP4
- Compare the visual result
- Watch the real two-stage workflow
- Download and verify the measured stages
- Should you convert first or compress first?
- How much compression should you use?
- What determines video file size?
- Common mistakes
- Submission checklist
- Frequently asked questions
- Solve compatibility first, then file size
Converting a video and compressing a video solve different problems.
- Convert when the file format or container is not accepted by the player, editor, website, or recipient.
- Compress when the format already works but the file is too large to store, send, or upload.
- Do both when the video is both incompatible and larger than it needs to be.
That distinction matters because changing MOV to MP4 does not guarantee a smaller file. In our measured LocalFlux test, the container conversion changed an 18,180,924-byte MOV into an 18,180,873-byte MP4, only 51 bytes smaller. Balanced compression then reduced the MP4 to 10,319,778 bytes, a 43.24% saving from the converted file.
| Stage | Format | Exact size | App display | Dimensions | Approx. bitrate |
|---|---|---|---|---|---|
| Source | MOV | 18,180,924 bytes | 17.3 MB | 1920 × 1080 | 12.120 Mb/s |
| After conversion | MP4 | 18,180,873 bytes | 17.3 MB | 1920 × 1080 | 12.120 Mb/s |
| After Balanced compression | MP4 | 10,319,778 bytes | 9.8 MB | 1920 × 1080 | 6.874 Mb/s |
The source and both outputs were about 12 seconds long, 30 fps, and contained H.264 video with AAC audio. LocalFlux created new files at each stage and left the MOV untouched.
Measured example, not a universal ratio: This fixture is synthetic and rights-cleared. Your result depends on duration, resolution, frame rate, codecs, bitrate, motion, noise, audio, and the selected compression settings.
Get LocalFlux from the Microsoft Store
The short answer
To convert and then compress a video locally with LocalFlux:
- Add the source video in Convert mode.
- Choose the compatible output format, such as MP4.
- Convert and inspect the new copy.
- Add that converted copy back to LocalFlux.
- Switch to Compress and choose a preset such as Balanced.
- Compress, then review the final size, dimensions, audio, and visual quality.
This is a two-stage workflow. Convert mode changes the format. Compress mode makes a smaller copy in the same supported format.
Convert, compress, both, or neither?
Use the requirement from the destination rather than guessing:
| Situation | Best starting action |
|---|---|
| The video plays and its size is accepted | Neither |
| The format is rejected, but the size is acceptable | Convert |
| The format is accepted, but the file is too large | Compress |
| The format is rejected and the file is too large | Convert, verify, then compress |
For example, a service may accept MP4 but reject MOV. Converting can solve that compatibility problem while leaving the encoded video and audio nearly unchanged. If the service also imposes a size limit, compression is a separate second requirement.
Why conversion may not reduce the file size
A video file contains encoded media streams inside a container. MOV, MP4, and MKV are containers; H.264, HEVC, VP9, and AV1 are examples of video codecs. AAC, Opus, and MP3 are audio codecs.
When the existing streams are already suitable for the new container, a converter may be able to copy them instead of encoding them again. In this test, LocalFlux preserved the reported H.264 and AAC codecs, dimensions, frame rate, duration, and approximate bitrate while changing the container. The 51-byte difference came from container-level structure rather than a meaningful size or quality change.
Other conversions must re-encode because the target container cannot carry the existing codec, because settings change, or because the application uses a normalized output profile. Re-encoding may make the file smaller or larger. It may also affect quality. The word “convert” alone does not predict the result.
Test setup
We used a controlled fixture rather than personal footage:
| Item | Tested value |
|---|---|
| App | LocalFlux 1.0.7.0 local x64 test build |
| Windows | Windows 11 x64, build 26200 |
| Source | Synthetic MOV remuxed locally from the project’s rights-cleared video fixture |
| Source media | H.264 video, AAC mono audio |
| Duration and frame rate | 12.00 seconds, 30 fps |
| Dimensions | 1920 × 1080 |
| Workflow | MOV → MP4, then MP4 → Balanced compressed MP4 |
| Destination | Same folder as each source |
The synthetic video contains motion and sound designed for repeatable testing. It is useful evidence for this workflow, but it does not represent every phone recording, screen capture, animation, or camera master.
Stage 1: convert MOV to MP4
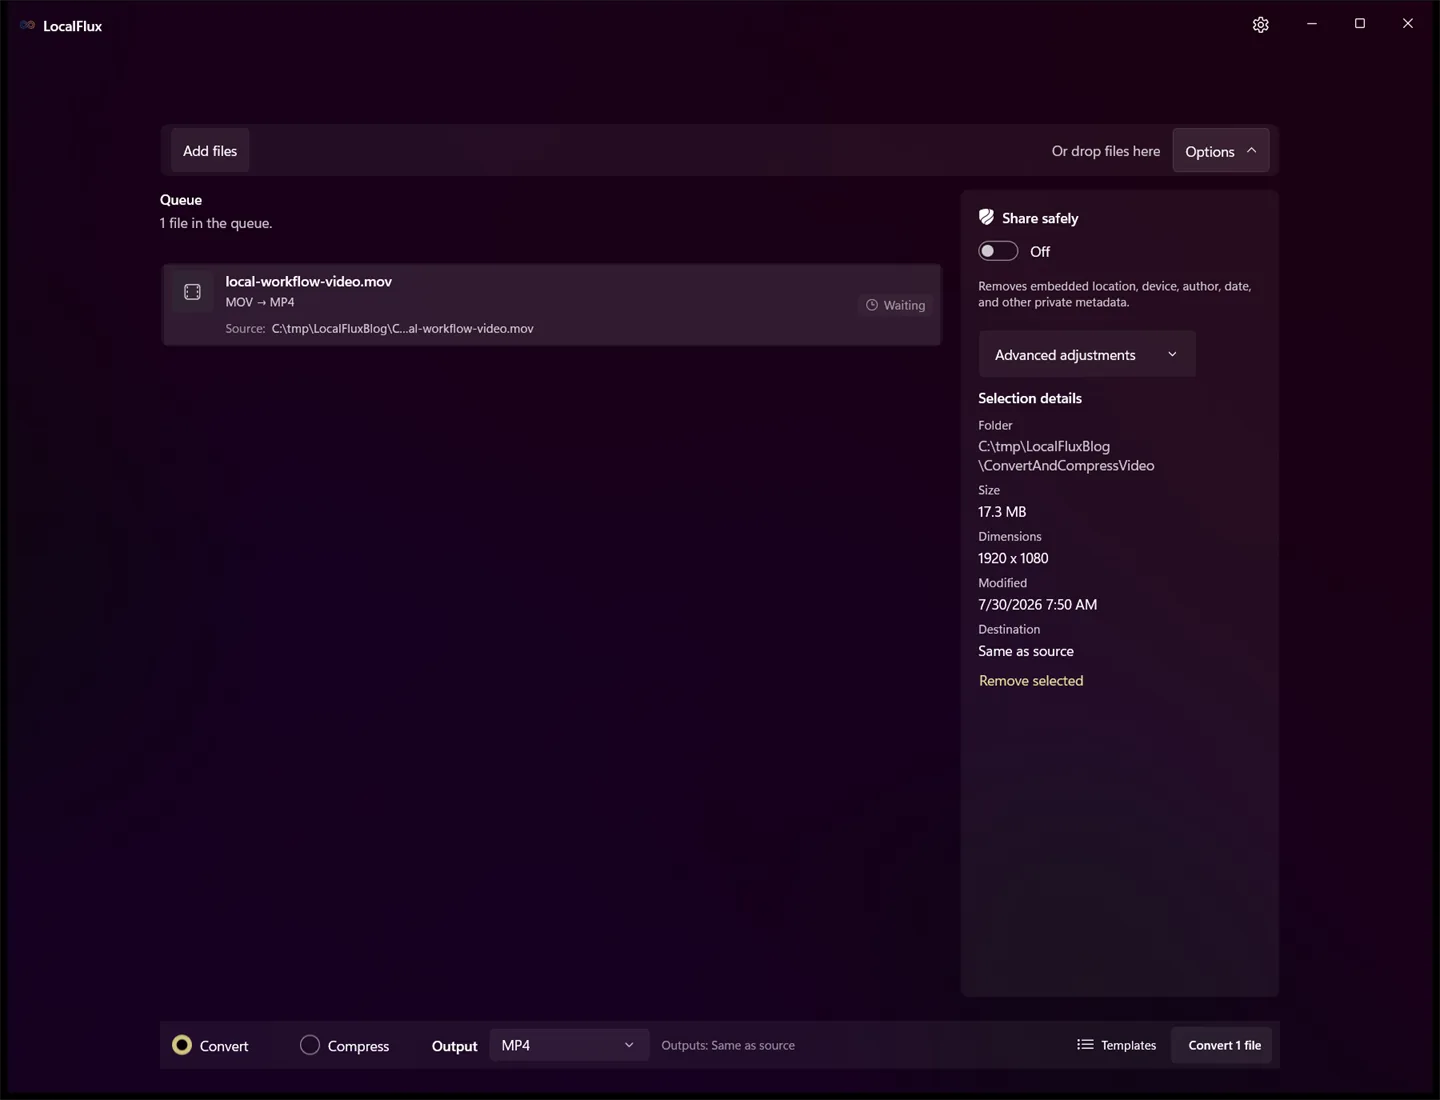
1. Add the MOV and select MP4
Open LocalFlux, add the MOV, and leave Convert selected. Open Options if you want to inspect the source details, then choose MP4 in the output menu.
The source is a neutral synthetic fixture inside C:\tmp\LocalFluxBlog. No personal path or private footage appears in the capture.
If compatibility is your only goal, keep the source dimensions unless the destination specifies otherwise. Changing resolution or quality adds another transformation and makes it harder to tell whether the format change alone solved the problem.
2. Convert and inspect the MP4 copy
Select Convert 1 file. When the job finishes, LocalFlux reports the saved file and the measured before-and-after size.
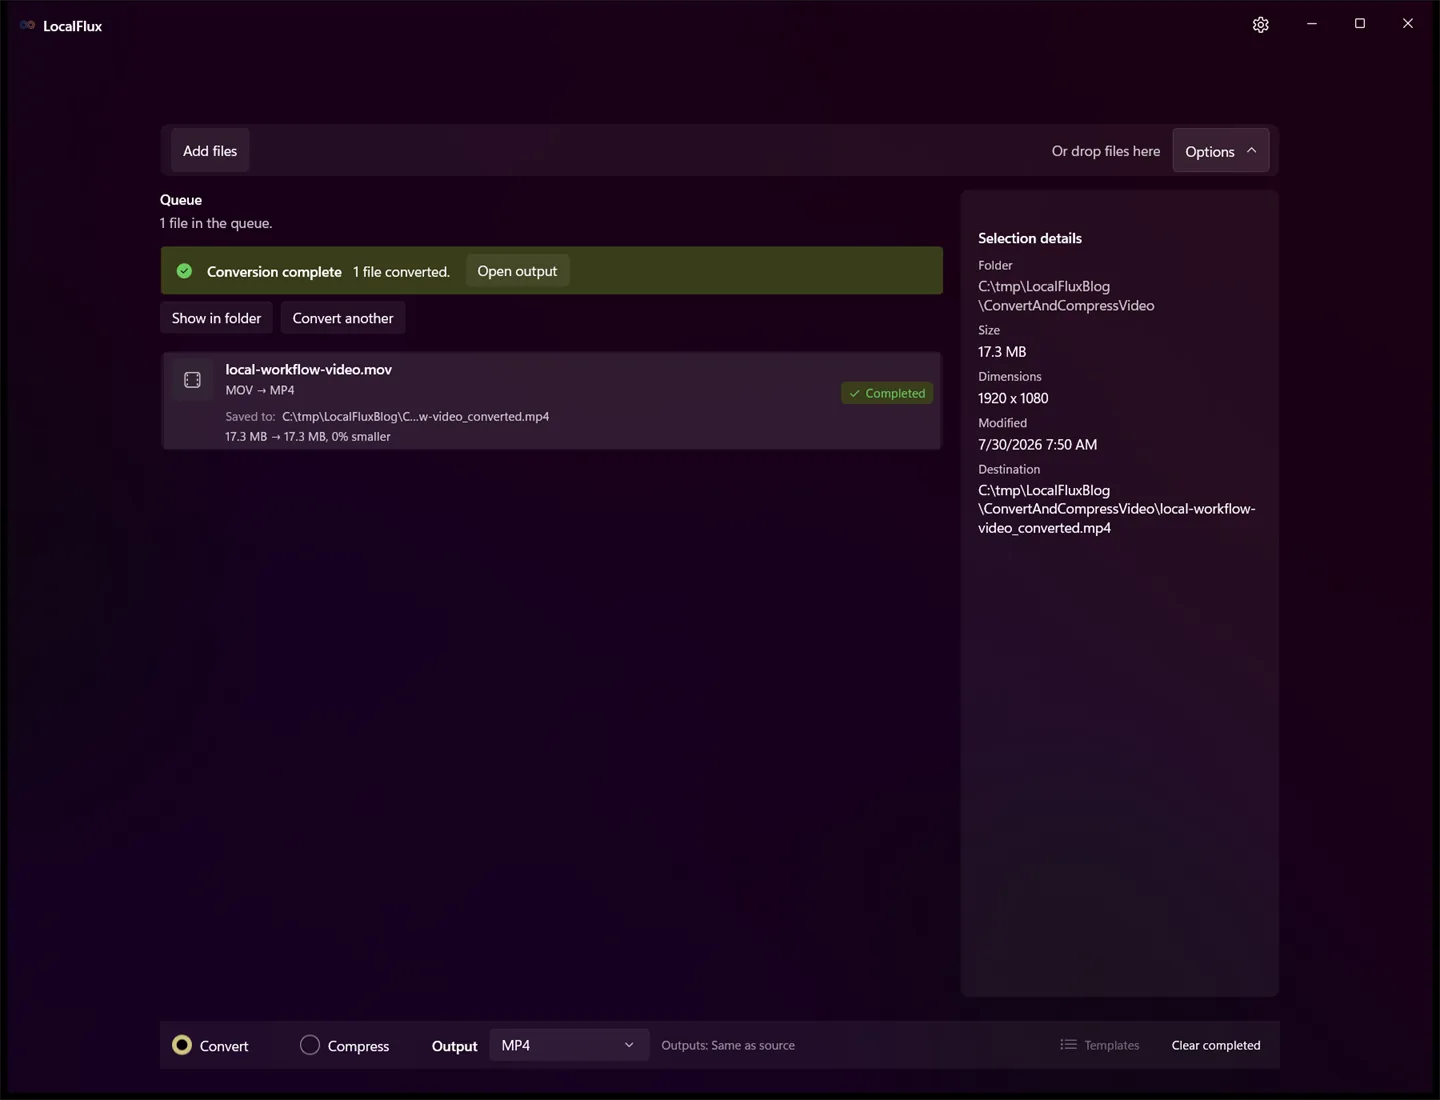
The exact result was:
- Source MOV: 18,180,924 bytes
- Converted MP4: 18,180,873 bytes
- Difference: 51 bytes, or about 0.00028%
That is effectively the same file size. It is a successful conversion because compatibility, not compression, was the requested outcome.
Before continuing, open the MP4 and verify:
- the full duration is present;
- video and audio stay synchronized;
- orientation and aspect ratio are correct;
- every required audio track is present; and
- captions or subtitles needed by the recipient still exist.
Container conversion can change how tracks and metadata are represented. A complex source with several audio tracks, embedded subtitles, chapters, timecode, or editing metadata deserves closer inspection than this simple one-video, one-audio fixture. For a track-focused example, see How to Convert MKV to MP4 on Windows Offline.
Stage 2: compress the converted MP4
3. Add the converted file and choose Compress
Add the new MP4 to LocalFlux and select Compress. Compress mode retains the supported source format, so this MP4 will produce another MP4.
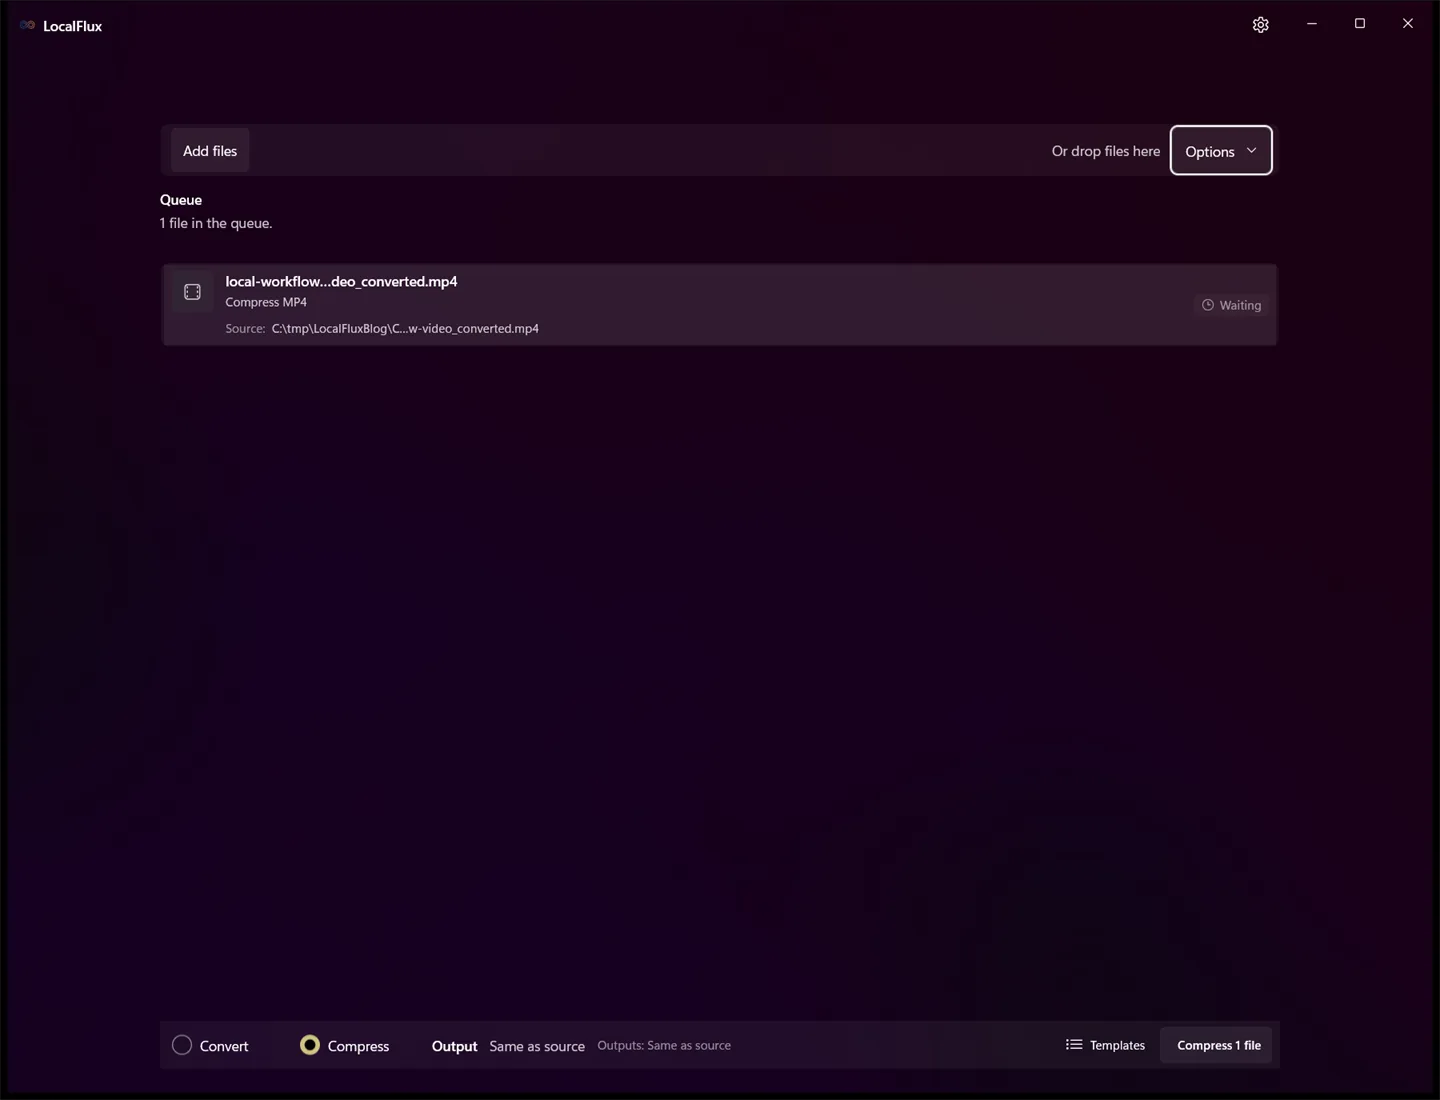
This separate step makes the intent clear: the first output solved the container requirement; the second output will target file size.
4. Choose a compression preset
Open Options and choose a preset. We selected Balanced (recommended), described in the tested app as keeping good quality with a noticeably smaller file while retaining the original dimensions.
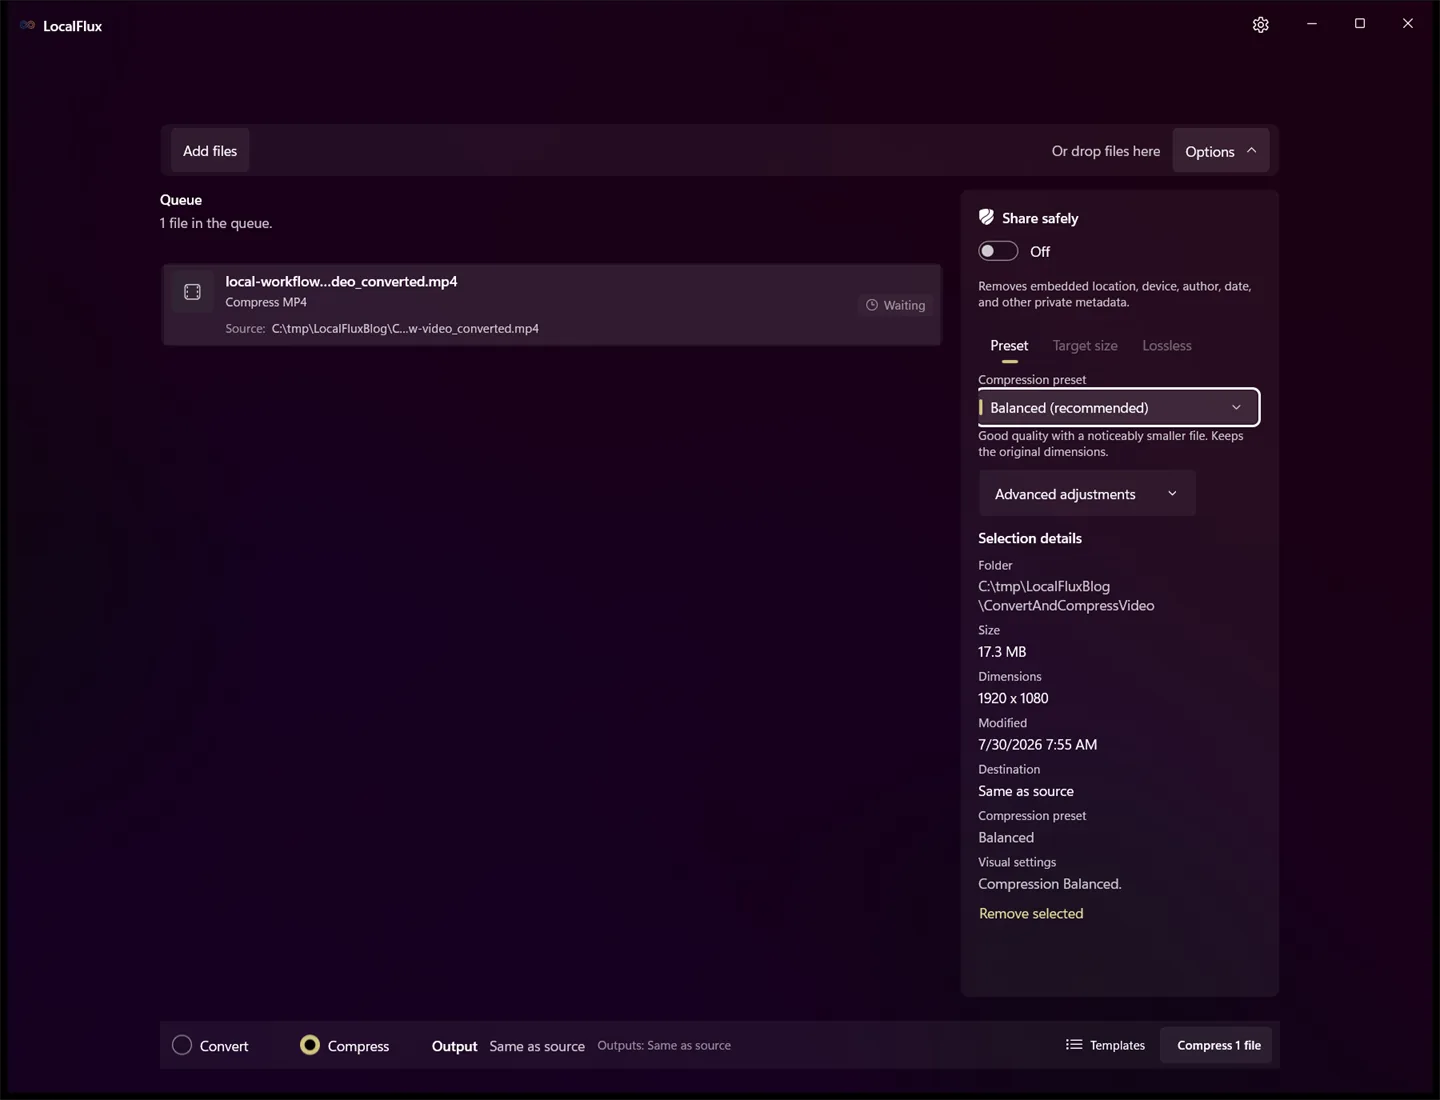
The available choices serve different priorities:
- Best quality: gentler compression and usually a larger result.
- Balanced: a middle ground for everyday copies.
- Smallest: a more aggressive reduction that may also constrain large video dimensions.
- Custom: direct control when you know the required dimensions or compression level.
No preset can promise one reduction percentage for every video. A low-motion slide presentation usually compresses differently from handheld footage containing water, confetti, foliage, grain, or fast camera movement.
5. Run the local compression
Select Compress 1 file. LocalFlux performs the work on the PC and shows the active job in the queue.
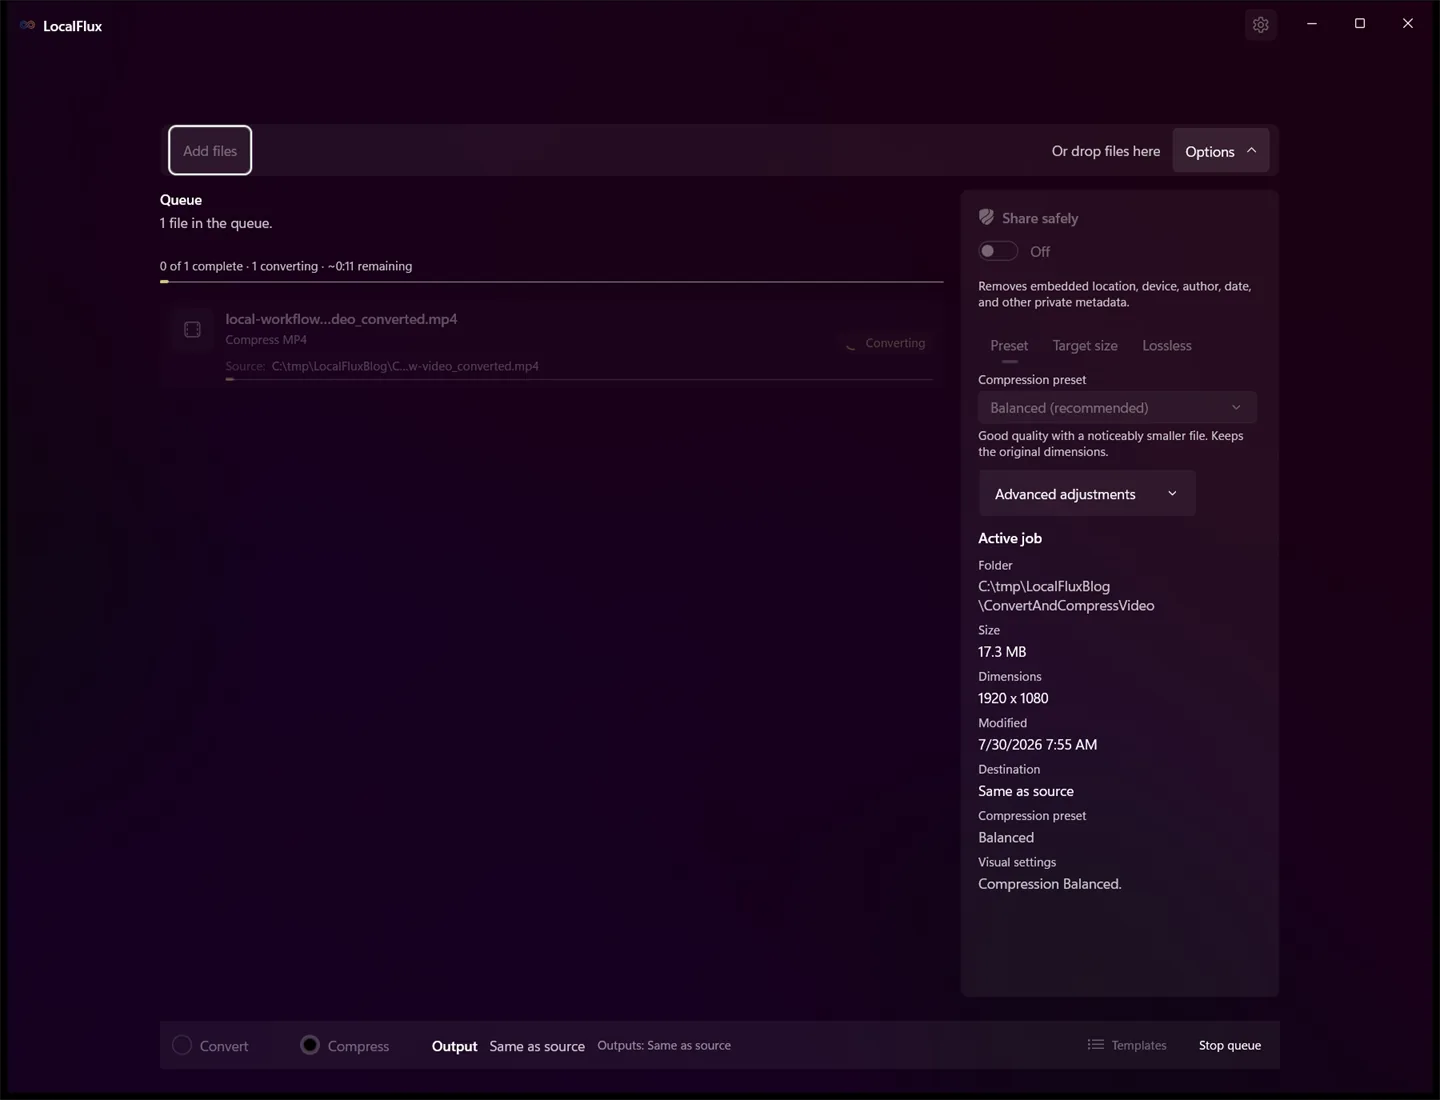
Processing time varies with video length, resolution, codec, hardware, and settings. The demonstration below is an edited sequence of real states, not a speed benchmark.
6. Review the final MP4
The completed job reported 17.3 MB → 9.8 MB, 43% smaller.
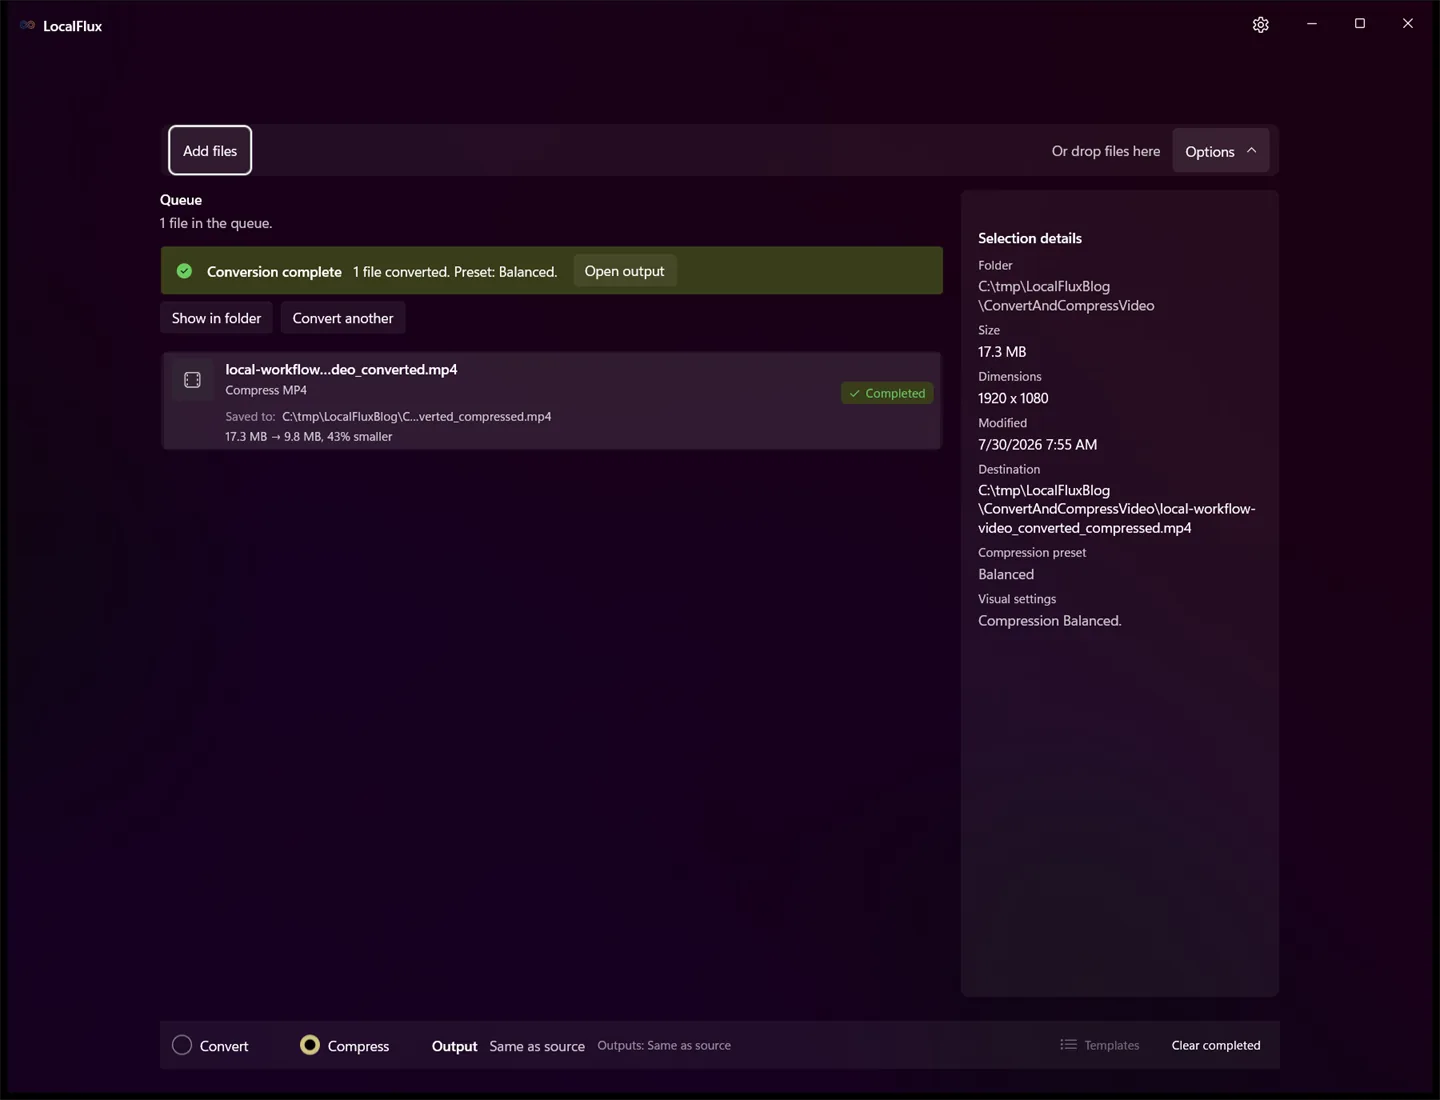
The exact converted-to-compressed result was:
| Measurement | Converted MP4 | Compressed MP4 |
|---|---|---|
| File size | 18,180,873 bytes | 10,319,778 bytes |
| Overall bitrate | 12.120 Mb/s | 6.874 Mb/s |
| Dimensions | 1920 × 1080 | 1920 × 1080 |
| Duration | 12.00 seconds | 12.01 seconds |
| Frame rate | 30 fps | 30 fps |
| Video codec | H.264 | H.264 |
| Audio codec | AAC | AAC |
The reduction was 43.24%. Dimensions remained unchanged, while the encoding bitrate fell. That is a compression result rather than a container-only change.
Compare the visual result
These frames show the same synthetic fixture at 6 seconds. Open either image at full size to inspect the checkerboard, diagonal edges, fine dots, and timestamp text.
| Converted MP4 before compression | Balanced compressed MP4 |
|---|---|
 |  |
At normal playback size, the overall composition remains recognizable. At full size, the compressed frame shows small changes around high-contrast edges and fine patterns. This pair is evidence for this fixture, not a promise that every video will look equivalent after a 43.24% reduction.
Watch the real two-stage workflow
Video transcript: A 17.3 MB synthetic MOV is ready to convert to MP4. The completed conversion still shows 17.3 MB. The new MP4 is added in Compress mode, Balanced is selected, the queue shows active compression, and the completed result reports 9.8 MB and 43% smaller. The clip is an edited sequence of genuine app states; it is not presented as a conversion-speed measurement.
Download and verify the measured stages
The exact rights-cleared MOV and converted MP4 used in this walkthrough are available alongside the matching compressed output:
- Source MOV, 18,180,924 bytes
- Actual converted MP4, 18,180,873 bytes
- Actual Balanced compressed MP4, 10,319,778 bytes
- Measurement manifest with SHA-256 values and calculations
The manifest records the byte sizes, SHA-256 values, duration, dimensions, frame rate, codecs, and percentage calculations. The published compressed sample has the same SHA-256 as the output created during this walkthrough.
Browser playback is useful for a quick check, but download both files and compare them at the intended display size when quality matters.
Should you convert first or compress first?
When the final requirement is a different format, convert first. Then verify that compatible copy before spending time compressing it. This order gives you a clean checkpoint and prevents you from optimizing a format the destination will reject anyway.
There are exceptions. If a conversion screen lets you deliberately choose the final dimensions and quality, one carefully configured conversion may avoid a second encode. That can save time and prevent an unnecessary generation of loss. The trade-off is that format and size changes happen together, so diagnosing a bad result is less straightforward.
The two-stage method in this article prioritizes clarity:
- Solve compatibility.
- Verify the tracks and playback.
- Solve file size.
- Verify quality again.
How much compression should you use?
Start with the least aggressive setting that satisfies the real constraint.
- For archiving or future editing, keep the original master.
- For a client preview, Balanced may be a sensible starting point.
- For a strict portal limit, you may need Custom settings or fewer pixels.
- For a small phone share, a reduced resolution may matter more than another bitrate adjustment.
Do not repeatedly compress an already compressed copy. Each lossy generation can discard more information. Return to the original or the verified converted checkpoint when testing a different preset.
What determines video file size?
For a fixed duration, total bitrate is the strongest rough predictor:
file size ≈ duration × combined video and audio bitrate
Resolution and frame rate affect how difficult the video is to encode, but they are not the file size by themselves. Two 1080p, 30 fps videos can differ enormously because their duration, bitrate, codecs, and content differ.
That is why this test retained 1920 × 1080 and 30 fps while shrinking by 43.24%: the compressed copy used a lower bitrate to represent the same duration and frame dimensions.
Common mistakes
Assuming MP4 is always smaller than MOV
MOV and MP4 are containers. Either can hold efficiently or inefficiently encoded streams. The codecs and bitrates matter more than the filename extension.
Renaming the extension
Changing .mov to .mp4 does not rewrite the container. It creates a misleading filename and may make compatibility worse.
Compressing before checking compatibility
A smaller MOV still fails if the destination requires MP4. Confirm the accepted format before choosing compression settings.
Deleting the source immediately
Keep the original until the converted and compressed copies have passed playback, track, and quality checks. Keep a backup for irreplaceable footage.
Judging only by the percentage saved
A dramatic saving is not automatically better. The smallest result may blur text, faces, or motion that the recipient needs to see.
Continuing after playback, tracks, or quality are wrong
Return to the untouched MOV or the verified converted checkpoint. If a track is missing or playback fails, correct the format or track settings before compressing again. If quality is unacceptable, try Best quality or a less aggressive Custom setting; reduce resolution only when the destination or viewing size makes that trade-off appropriate.
Submission checklist
Before sending or uploading the final copy:
- Confirm the destination accepts MP4 and the codecs inside it.
- Confirm the exact file size is below any stated limit.
- Play the beginning, middle, and end.
- Listen for sync errors, distortion, or missing audio.
- Check required subtitles, captions, chapters, and alternate tracks.
- Inspect text and fast motion at the intended display size.
- Confirm orientation, dimensions, and frame rate are appropriate.
- Keep the original master and identify the final copy clearly.
Frequently asked questions
Does converting a video reduce its quality?
Not necessarily. A compatible stream-copy conversion can change only the container. A conversion that re-encodes video or audio can affect quality. Inspect the output rather than inferring from the extension.
Does converting MOV to MP4 make it smaller?
Sometimes, but not reliably. Container choice alone does not predict the result; compare the measured output instead of assuming MP4 will be smaller.
Does LocalFlux convert and compress in one click?
Convert and Compress are separate modes in the tested version. A conversion can include optional visual adjustments, but the explicit two-stage process makes compatibility and file-size outcomes easier to verify independently.
Will compression change MP4 into another format?
Not in Compress mode for this workflow. The MP4 produced another MP4. Use Convert when another output format is required.
Why did the compressed video keep the same resolution?
Balanced retained the original 1920 × 1080 dimensions for this fixture and reduced the bitrate instead. More aggressive or custom settings can produce a different outcome.
Can I process several videos?
Yes. Add supported files to the queue and apply an appropriate workflow. Because videos can have different tracks, codecs, and compressibility, test representative files before starting an important large batch.
What if I only need MOV to MP4?
Stop after the converted file passes verification. The dedicated MOV-to-MP4 walkthrough covers that shorter workflow.
What if my MP4 is simply too large?
Skip conversion and go directly to How to Compress a Large Video on Windows Without Uploading It.
Solve compatibility first, then file size
“Convert” and “compress” are not interchangeable. In this controlled LocalFlux test, MOV-to-MP4 conversion solved the container requirement while changing the size by only 51 bytes. Balanced compression then delivered the real reduction: 18,180,873 bytes to 10,319,778 bytes, with the same 1920 × 1080 dimensions.
Use only the stage you need. If you need both, keep them explicit, verify each output, and retain the source as the master.