
How to Compress a PDF on Windows Without Uploading It
Compress PDF files locally on Windows 11, compare verified before-and-after sizes, and handle optimized, encrypted, or signed documents safely.
On this page
- The short version
- What PDF compression actually changes
- The privacy-safe files used for this test
- Step 1: Add the PDFs
- Step 2: Choose Compress and review the destination
- Step 3: Start with the Balanced preset
- Step 4: Run the batch locally
- Step 5: Read the results, including zero savings
- Step 6: Check the compressed copies
- What happens with encrypted or signed PDFs?
- Does compressing a PDF remove metadata?
- How this guide was verified
- When local PDF compression is the right choice
- FAQ
A PDF can be too large for an email attachment, a document portal, or a shared folder even when its pages look ordinary. The quickest-looking fix is often an online compressor, but uploading a contract, report, form, or internal handout to another service may be unnecessary.
LocalFlux can compress a PDF directly on Windows 11. You select files from local storage, choose a compression preset, and create new PDF copies without a file-upload step. The originals remain in place, and the app reports the measured result for each file.
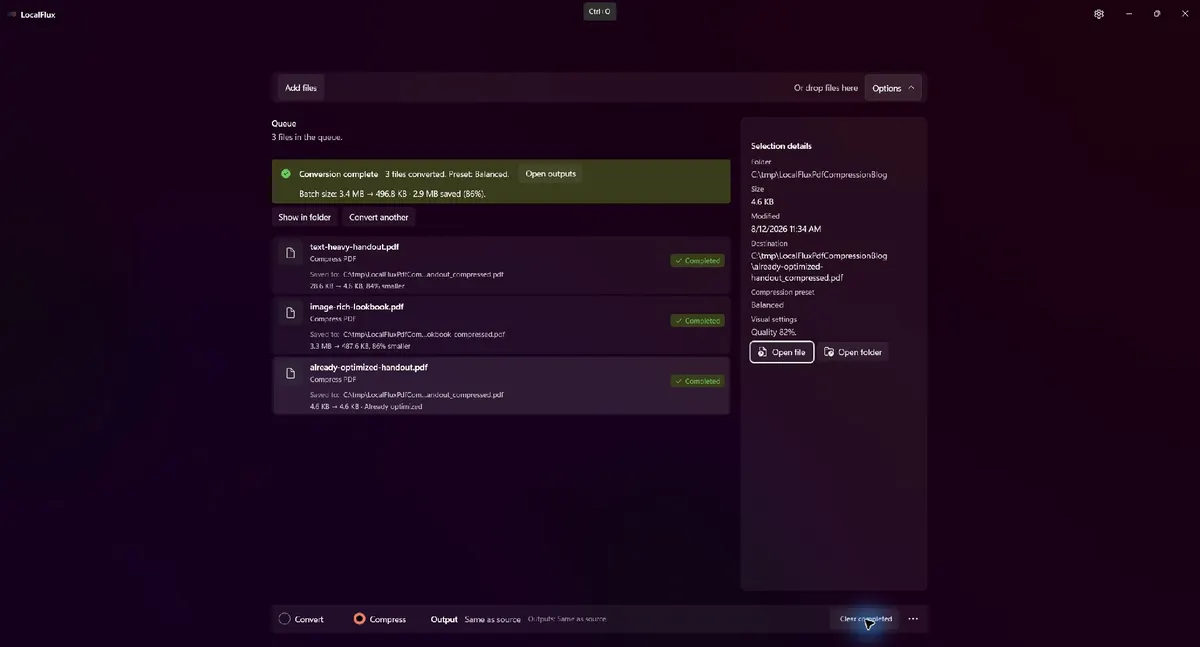
In this tested three-file batch, LocalFlux reduced the combined size from 3,517,643 bytes to 508,746 bytes. One deliberately pre-optimized PDF stayed byte-for-byte identical. These are fixture results, not a promise that every PDF will shrink by the same amount.
Short answer: add your PDFs, keep Compress selected, start with Balanced, run the batch, and inspect the new
_compressed.pdffiles before sharing them.Keep the originals: compression can reorganize PDF structures and, depending on the preset and source, re-encode embedded images. Treat the compressed file as a delivery copy rather than your only master.
The short version
- Open LocalFlux on Windows 11.
- Add one or more PDF files.
- Select Compress at the bottom of the window.
- Open Options and start with Balanced (recommended).
- Select Compress files.
- Review the measured savings and open the new files.
- Check every page, especially photographs, scans, diagrams, small text, forms, and links.
- Keep the original PDFs until the delivery copies have passed review.
Get LocalFlux from the Microsoft Store, or review LocalFlux privacy and local-processing information before starting.
What PDF compression actually changes
A PDF is a container. It can hold text, fonts, vector artwork, photographs, scans, transparency, form fields, annotations, attachments, and other document structures. Two PDFs with the same number of pages can therefore respond very differently to compression.
Compression may save space by reorganizing objects, compressing compatible streams, removing redundant structure, or re-encoding eligible images. A text-heavy file with inefficient internal structure can shrink substantially without changing its visible page dimensions. A scan or photo-heavy file may depend more on image optimization. A PDF that was already optimized may not become smaller at all.
That leads to three practical rules:
- Judge the output by measured bytes, not by the preset name alone.
- Review visible quality on the content that matters most.
- Do not expect one percentage to apply to every PDF.
Compression is also different from sanitization. A smaller PDF is not automatically stripped of author fields, comments, attachments, form values, or other sensitive content. If disclosure risk matters, review those elements separately. You can also check the currently documented LocalFlux formats and routes before planning a larger workflow.
The privacy-safe files used for this test
This walkthrough uses three self-authored fixtures in C:\tmp\LocalFluxPdfCompressionBlog:
- a five-page, text-heavy handout with deliberately unoptimized streams;
- a four-page, image-rich lookbook built from repository-controlled LocalFlux media; and
- a five-page handout optimized before the LocalFlux run.
The files contain no names, email addresses, customer records, account identifiers, or personal Windows profile paths. They are published with this guide so you can inspect both sides of the comparison yourself.
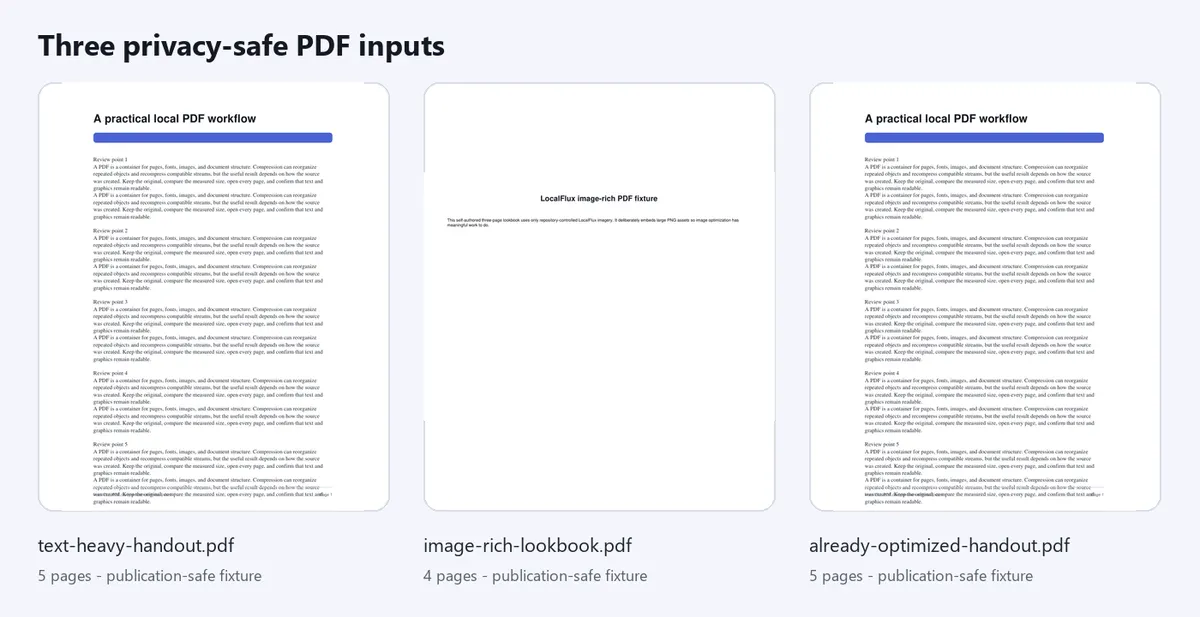
The fixture set covers text structure, embedded images, and the important case where a PDF has no additional savings available.
Download the reproducible PDF set
| Fixture | Original | Verified LocalFlux output |
|---|---|---|
| Text-heavy handout | Download the 29,266-byte input PDF | Download the 4,742-byte compressed PDF |
| Image-rich lookbook | Download the 3,483,636-byte input PDF | Download the 499,263-byte compressed PDF |
| Already optimized handout | Download the 4,741-byte input PDF | Download the byte-identical output PDF |
These are synthetic editorial fixtures, not customer documents. The encrypted and signature-detector boundary fixtures are intentionally not published.
Step 1: Add the PDFs
Open LocalFlux and add the PDF files you want to compress. You can use Add files, the Windows file picker, drag and drop, or a supported Explorer entry point. For a batch, check that the queue contains only the intended documents before continuing.
LocalFlux shows the selected file names, source folder, individual sizes, and a batch estimate. In this example, all visible paths use the neutral C:\tmp working folder.
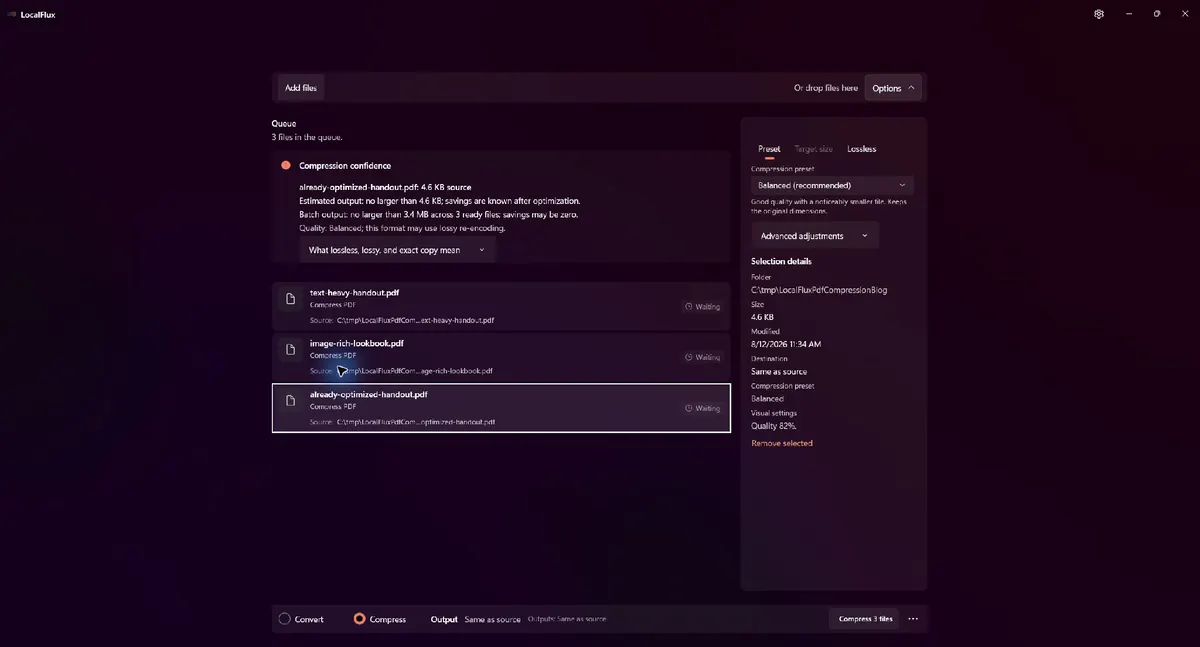
The three PDFs are ready in one batch. The right panel shows the selected item, destination, preset, and visual-quality setting.
By default, the output is written beside the source with _compressed added to the file name. For example, report.pdf becomes report_compressed.pdf. That separate-file behavior makes comparison easier and avoids silently replacing the original.
Step 2: Choose Compress and review the destination
Keep Compress selected at the bottom of the window. The destination shown in the selection details should be the folder where you expect to find the result. If the source folder is read-only or not appropriate for delivery copies, choose a different output location before starting.
For confidential work, a local workflow removes the need to transmit the source PDF to a web compressor. It does not replace ordinary endpoint controls: use an appropriate Windows account, protect the drive, and remove temporary copies when your retention policy requires it.
Step 3: Start with the Balanced preset
Open Options and review the available preset choices. The tested LocalFlux 1.0.8 build offered Best quality, Balanced (recommended), Smallest, and Custom, plus a separate Lossless mode.
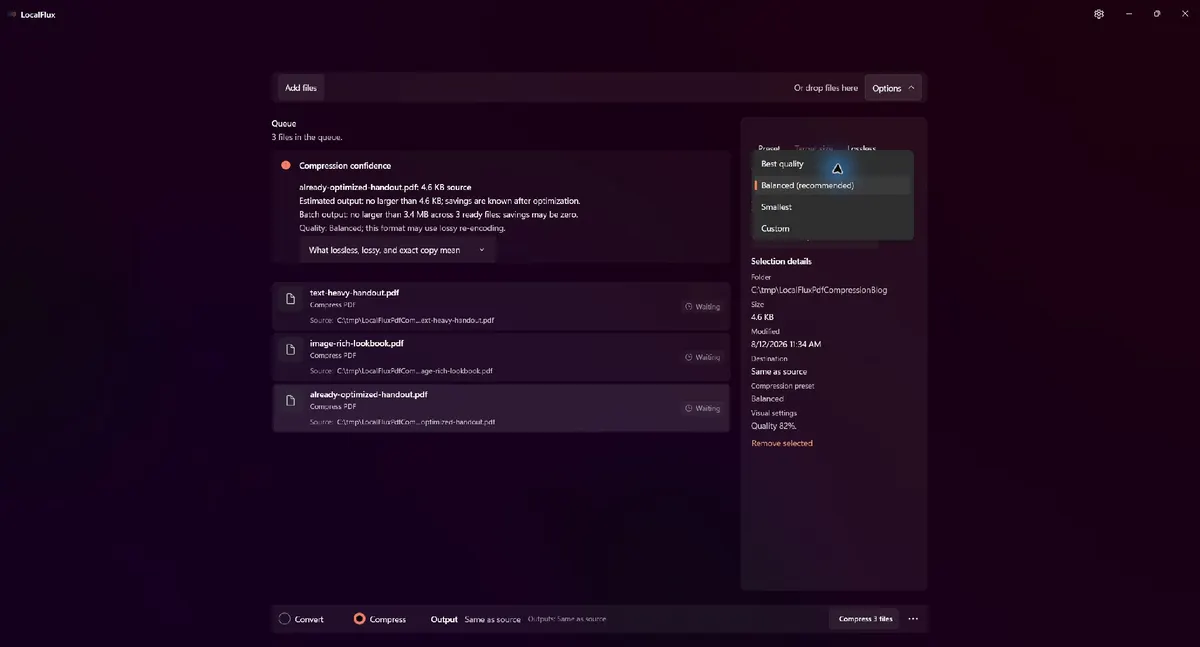
Balanced is selected for this walkthrough. In the tested build it kept the original page dimensions and used a visual quality setting of 82% for eligible image optimization.
Use the presets as starting points:
| Choice | Practical starting point |
|---|---|
| Best quality | When visual fidelity matters more than maximum reduction |
| Balanced | General sharing, email, portals, and document delivery |
| Smallest | When a strict upload or attachment limit matters and you can accept more aggressive image compression |
| Custom | When you need to tune the visual-quality trade-off yourself |
| Lossless | When you want structural optimization without lossy image re-encoding |
Only Balanced was measured for this article. Do not assume that Smallest will remain acceptable for scanned signatures, fine diagrams, screenshots, or small labels. Test those pages at normal viewing size and at a useful zoom.
Step 4: Run the batch locally
Select Compress files. LocalFlux processes each source and writes a new output. You can continue to use the computer while a larger document runs, but avoid moving or renaming the source files until the batch finishes.
The completion view reports the combined result and the outcome for each file. If a PDF can be reduced, you see the source size, output size, and percentage saved. If rewriting would not make it smaller, LocalFlux keeps an exact copy as the output and labels the item Already optimized.
Step 5: Read the results, including zero savings
Here are the exact results from the tested batch:
| Fixture | Pages | Source | Output | Reduction |
|---|---|---|---|---|
| Text-heavy handout | 5 | 29,266 bytes | 4,742 bytes | 83.8% |
| Image-rich lookbook | 4 | 3,483,636 bytes | 499,263 bytes | 85.7% |
| Already optimized handout | 5 | 4,741 bytes | 4,741 bytes | 0.0% |
| Combined | 14 | 3,517,643 bytes | 508,746 bytes | 85.5% |
The large reductions are intentional stress-test results. The text fixture was created with inefficient streams, while the lookbook embeds large PNG assets so image optimization has meaningful work to do. A typical office PDF may save much less.
The already-optimized result is just as useful: its output SHA-256 hash matched the input hash exactly. LocalFlux did not replace a 4,741-byte source with a larger rewritten file simply to claim that compression had occurred.
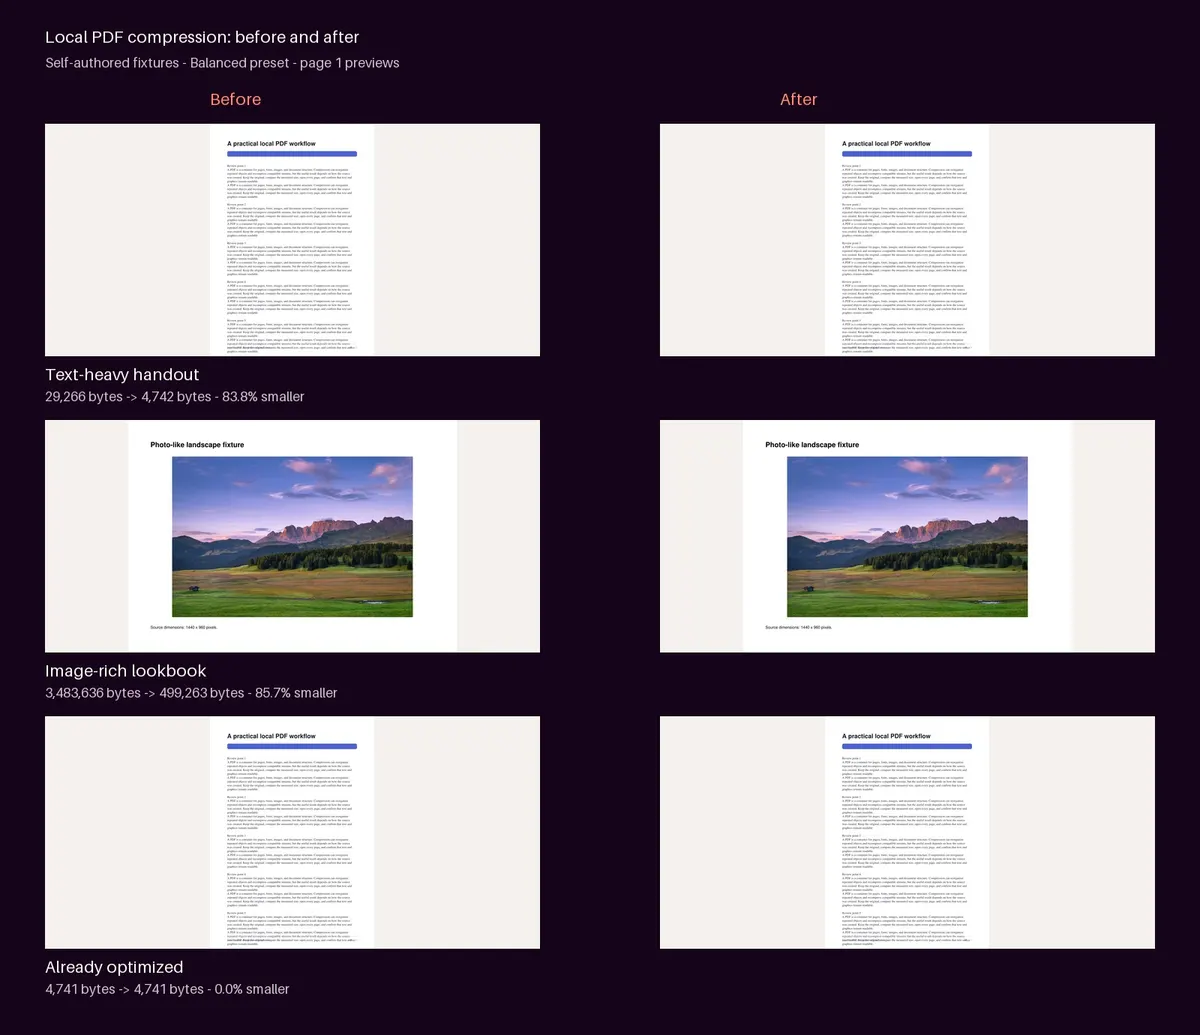
All 28 rendered input and output pages were reviewed. Page counts remained 5, 4, and 5; the text stayed readable; the image-rich pages retained their intended layout; and the already-optimized pair was byte-identical.
Step 6: Check the compressed copies
Do not stop at the green completion message. Open each output and check:
- the first and last page;
- every page in short documents;
- photographs and scanned pages at a useful zoom;
- small labels, thin lines, and gradients;
- selectable text and search where expected;
- links, form fields, annotations, and attachments that your workflow depends on; and
- the exact file size against any portal or email limit.
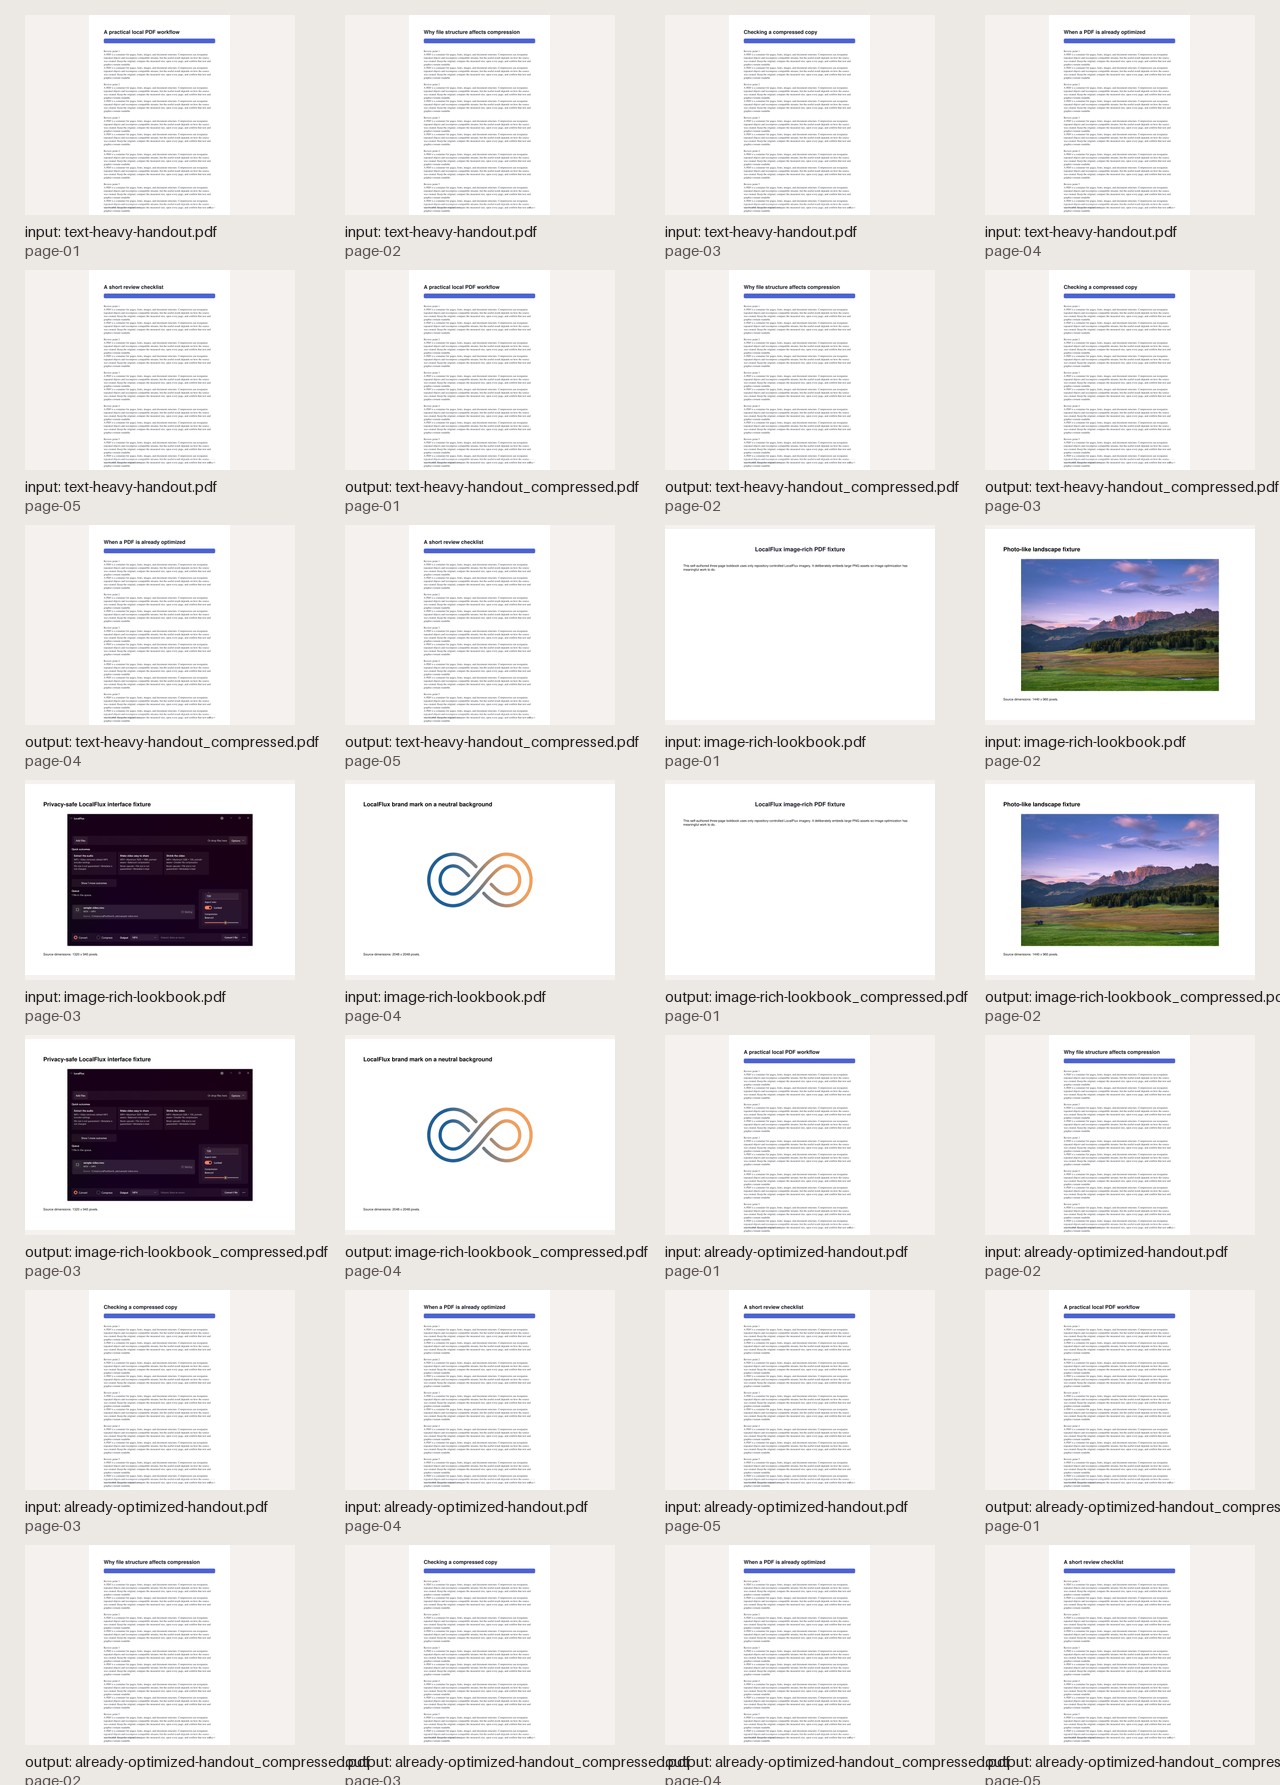
For this editorial test, every source and output page was rendered at 2x resolution and visually inspected. A qpdf integrity check also completed without syntax or stream-encoding errors for all three outputs. The source hashes were recorded before and after the run and did not change.
What happens with encrypted or signed PDFs?
Rewriting a protected PDF can conflict with its security or trust model. The tested build fails closed for two important cases:
- Encrypted PDF: LocalFlux asks you to remove encryption and try again. Only do that when you are authorized to create an unencrypted working copy.
- Digitally signed PDF: LocalFlux refuses compression because rewriting the file would invalidate the signature.
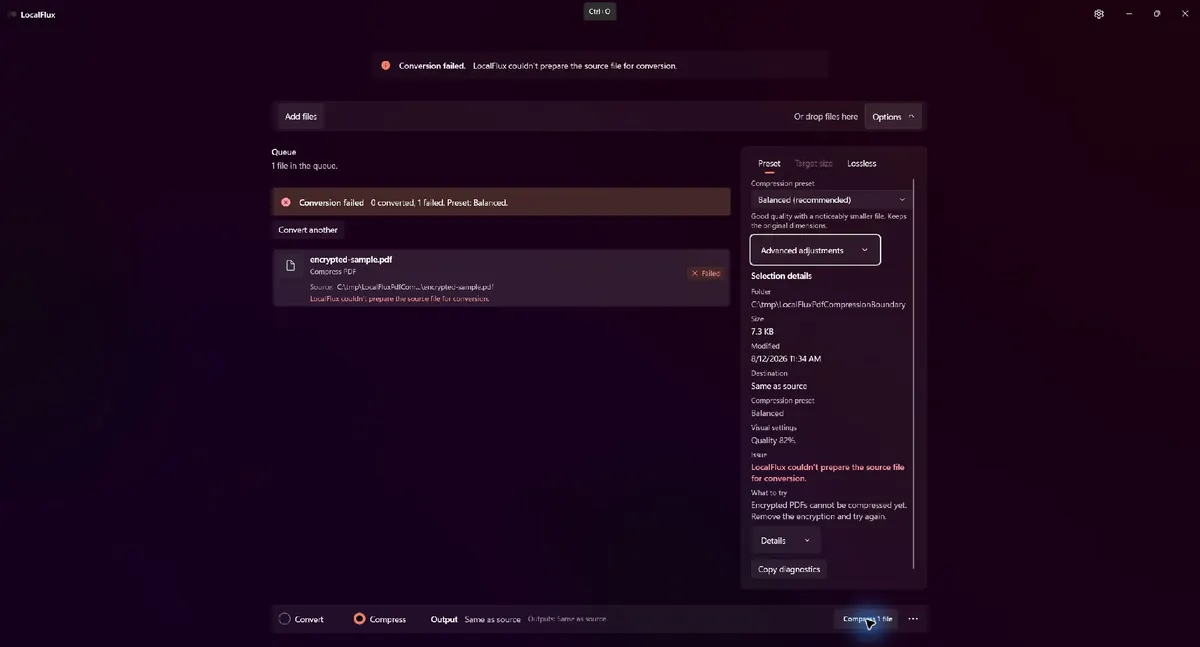
The encrypted fixture produced no output file. A separate signature-shaped fixture was also rejected with the signed-document warning and produced no output.
If a signed document is too large, return to the unsigned source, create an appropriately compressed delivery copy, review it, and then apply the required signature through your approved process. Do not compress the signed artifact and present it as if the original signature still applied.
Does compressing a PDF remove metadata?
No such assumption is safe. PDF compression is intended to reduce file size, not to guarantee removal of document properties or hidden content. Before sharing a sensitive file, separately review:
- title, author, subject, keywords, and custom properties;
- comments, annotations, layers, and attachments;
- filled or hidden form values;
- redactions and the underlying content they are meant to remove; and
- any organization-specific classification or retention data.
Visual black boxes are not reliable redaction. Use a purpose-built redaction workflow, then verify the exported document.
How this guide was verified
The measurements come from LocalFlux 1.0.8.0 on a local Windows 11 x64 host using the Balanced preset. The test covered 14 source pages and 14 output pages. Every page was rendered and visually inspected; each output passed qpdf integrity checks; page counts and dimensions were preserved; and source-file SHA-256 hashes remained unchanged.
The encrypted fixture and a synthetic signature-detector fixture both failed closed and created no output. This is editorial reproduction evidence from one host, not broad release qualification, an ARM64 test, a print proof, an accessibility-tree audit, or a promise of universal savings.
You can inspect the complete publication package:
- Test record and exact procedure
- Measurements in CSV format
- Structured verification results
- Privacy and publication review
- SHA-256 media manifest
- Fixture generator and output-verification script
- 28-page visual inspection sheet
When local PDF compression is the right choice
Local compression is a strong fit when the document may contain internal, contractual, financial, educational, or personal information and there is no business reason to upload it to a third-party web tool. It is also useful when the network is slow, unavailable, or restricted.
An online service can still be appropriate when your organization has approved it, its data-handling terms meet your requirements, and you need a feature that is not available locally. The important distinction is control: know where the file is processed, what is retained, and who is permitted to access it.
For everyday Windows work, the safer habit is simple: keep the master, create a local delivery copy, measure the result, and inspect it before sending.
FAQ
Can every PDF be made smaller?
No. A PDF may already use efficient object streams and compressed images. LocalFlux can return an exact-copy output when a rewrite would be larger.
Does Balanced change the paper size or page count?
It did not in this test. All three outputs kept their original page counts and page dimensions. Eligible embedded images may still be re-encoded, so visual review remains necessary.
Will the original PDF be overwritten?
Not in the tested default workflow. LocalFlux wrote a separate _compressed.pdf file beside each source, and the recorded source hashes were unchanged.
Can I compress a password-protected PDF?
The tested build rejected the encrypted fixture. Remove protection only from a document you are authorized to modify, then compress the authorized working copy.
Is a compressed PDF safe to publish?
Smaller does not mean sanitized. Review content, metadata, comments, forms, attachments, redactions, accessibility, and visual quality according to your publishing requirements.
Ready to create a smaller delivery copy without a browser upload? Get LocalFlux from the Microsoft Store and start with Balanced on a duplicate or well-preserved source.