
How to Convert Files From the Windows 11 Right-Click Menu
Convert, compress, optimize, or create WebP files from File Explorer on Windows 11, with tested batch rules and no browser upload.
On this page
- The short version
- What each right-click action does
- Where the command appears in Windows 11
- Test setup for this guide
- Use Convert for a normal format change
- Use Compress when the format can stay the same
- Use Optimize for sharing for privacy-safe copies
- Use Convert to WebP for compatible images
- How LocalFlux handles a mixed selection
- What happens with an unsupported file
- Where outputs go and what happens to originals
- Does right-click conversion upload files?
- Troubleshooting a missing or unexpected menu
- Which action should you choose?
- Frequently asked questions
- A faster workflow without giving up review
- Publication evidence
- Practical checks before and after conversion
Windows 11 already puts everyday file work in File Explorer. You select the files, right-click, and choose what should happen next. A converter that appears in that same menu removes the detour of opening a website, uploading a batch, downloading the results, and moving everything back into the folder where it started.
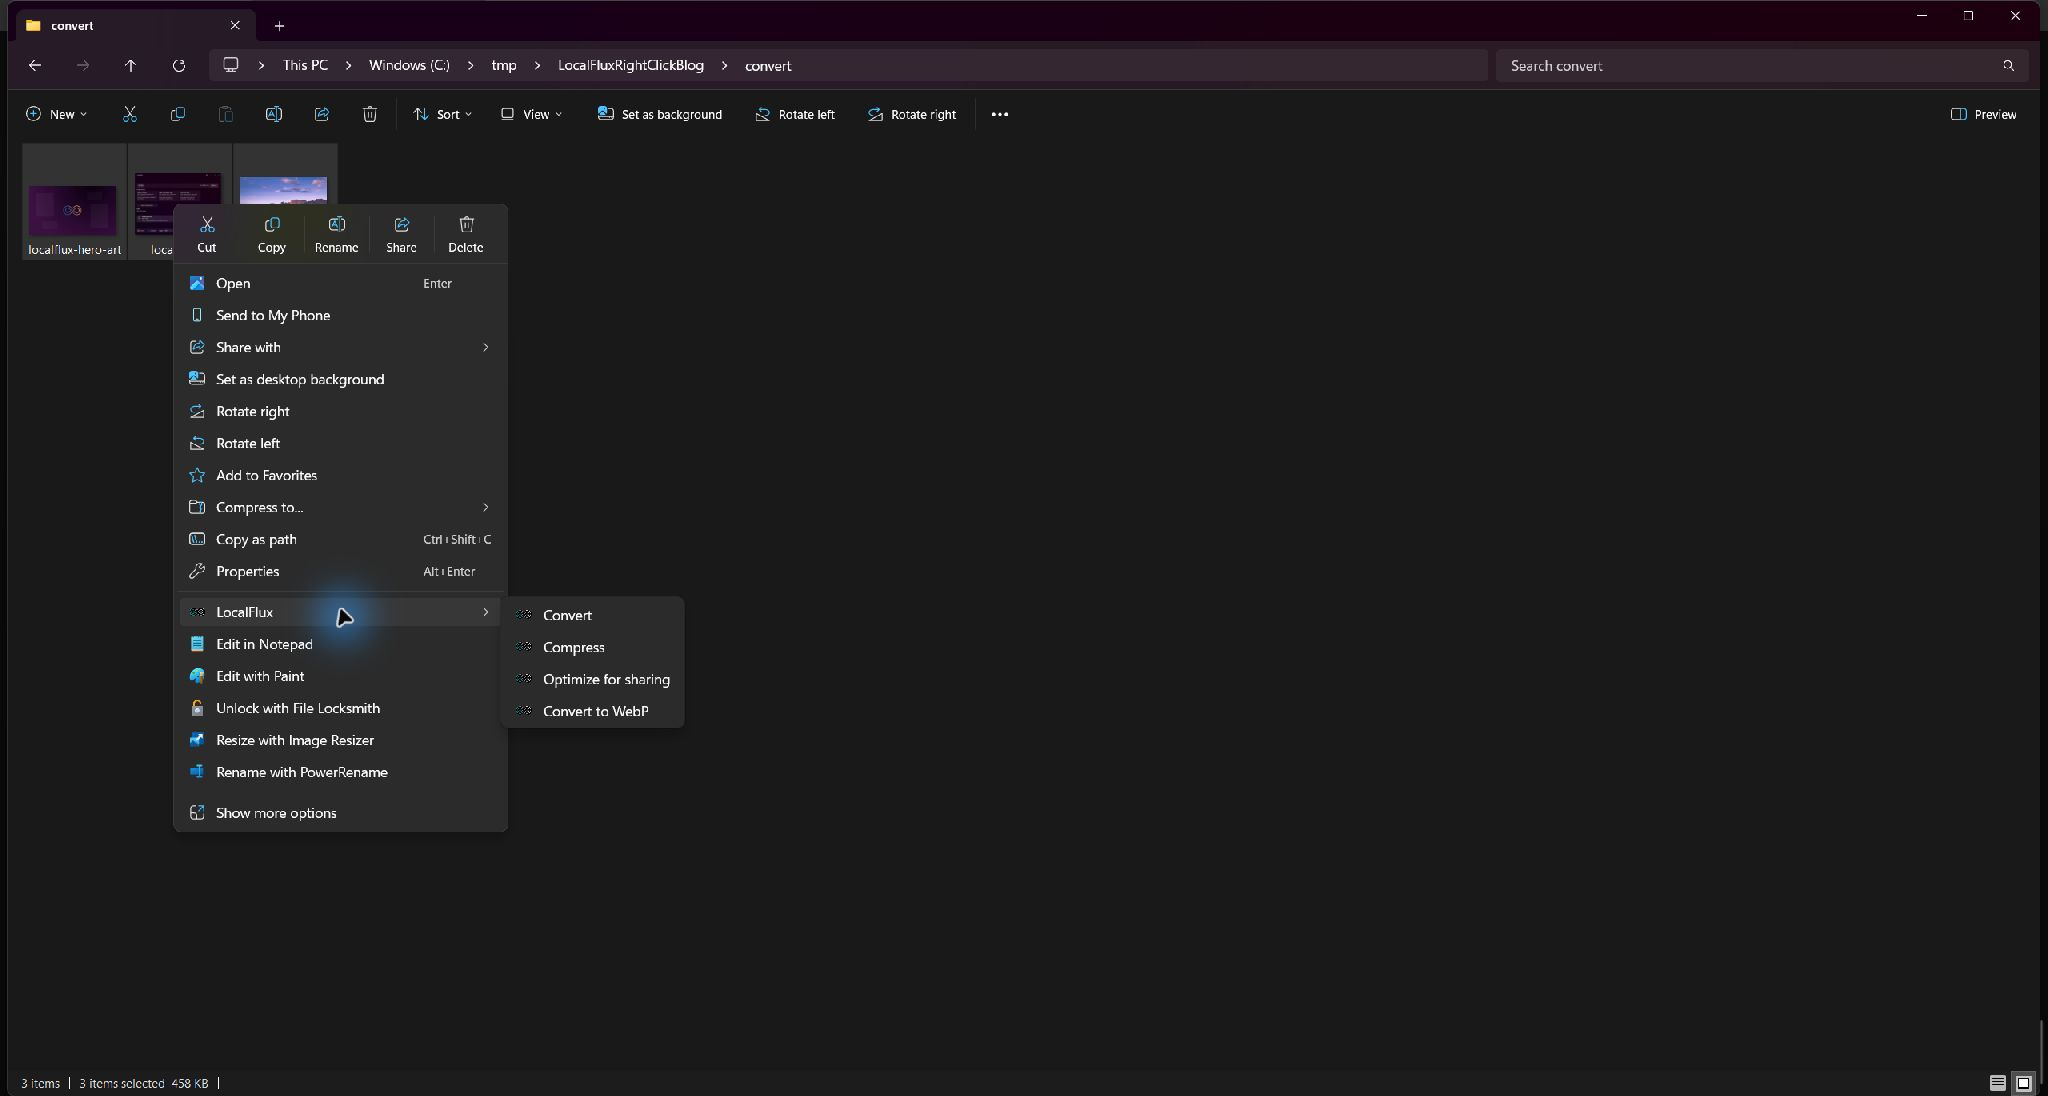
LocalFlux adds four commands to the modern Windows 11 right-click menu: Convert, Compress, Optimize for sharing, and Convert to WebP. Select one or more supported local files, open LocalFlux in the context menu, and choose the outcome. The app opens with the eligible selection already queued and writes new output files beside the originals by default.
The tested Windows 11 menu grouped all four commands under LocalFlux. The fixtures lived under C:\tmp, and the taskbar was excluded from the publication image.
Best for: repeated conversions, quick image compression, privacy-conscious sharing copies, and JPG/PNG-to-WebP jobs that begin in File Explorer.
Know the limit: the menu is selection-aware. Unsupported files may be ignored, an unsupported-only selection will not show LocalFlux, and some actions deliberately accept a narrower subset than the files you selected. Review the queue before running a batch.
The short version
- In File Explorer, select one or more supported files.
- Right-click the selection.
- Open the LocalFlux submenu.
- Choose Convert, Compress, Optimize for sharing, or Convert to WebP.
- Review the files and settings that LocalFlux queued.
- Run the batch.
- Open the new copies from the completion screen or find them in the source folder.
Get LocalFlux from the Microsoft Store, check the supported formats and routes, or read the broader LocalFlux user guide before working through a large folder.
What each right-click action does
The four commands are shortcuts to different outcomes, not four names for the same operation.
| Right-click action | What it prepares | Good first use | What to check |
|---|---|---|---|
| Convert | A normal conversion queue with a compatible output format | Change JPG to PNG, WAV to MP3, or another supported route | Output format, dimensions, and filename |
| Compress | A compression queue using the Balanced preset by default | Reduce image bytes while keeping the same general format | Actual savings and visual quality |
| Optimize for sharing | Safe copies with metadata removal, compression, and privacy-safe filenames | Prepare photos for email, chat, or a public upload | The safe-copy summary and what metadata removal does not hide |
| Convert to WebP | An image-only conversion queue with WebP selected | Prepare compatible JPG or PNG images for web delivery | Which files were admitted and the measured size change |
The right choice depends on the job. Use Convert when the destination format is the main requirement. Use Compress when the current format is acceptable but the file is heavier than it needs to be. Use Optimize for sharing when you want a new, sanitized sharing copy. Use Convert to WebP when WebP is specifically the delivery format you need.
Where the command appears in Windows 11
LocalFlux uses the modern Windows 11 File Explorer context-menu mechanism. Microsoft documents that packaged desktop apps can implement IExplorerCommand, register a windows.fileExplorerContextMenus extension, and group child commands in an app-attributed flyout. That is why the four LocalFlux actions can appear together in the first right-click menu instead of being limited to the legacy Show more options menu.
The practical sequence is simple:
- Open the folder containing the source files.
- Select the files themselves, not the empty folder background.
- Right-click any selected item.
- Point to LocalFlux.
- Select the required action.
If LocalFlux is installed but the command is missing, first confirm that at least one selected item is a supported local file. Microsoft also notes that File Explorer may need to be restarted—or the Windows session signed out and back in—after a package install or update before a newly registered shell extension appears.
Test setup for this guide
This walkthrough was reproduced on a local Windows 11 x64 host with the retained LocalFlux 1.0.8.0 x64 MSIX. The working root was C:\tmp\LocalFluxRightClickBlog, not a profile folder, cloud-synced directory, or customer location.
Three rights-cleared JPG fixtures were copied into separate folders for each action:
localflux-hero-art.jpg, 66.3 KB, 1920 × 1080;localflux-ui.jpg, 123.8 KB, 1320 × 940; andmountain-photo.jpg, 268.5 KB, 1440 × 960.
Using separate source folders kept every test independent. It also made it possible to hash the original files before and after the work and confirm that LocalFlux created new outputs instead of overwriting the inputs. These results describe this exact fixture set and build; they are not a promise that every file will shrink by the same percentage.
Use Convert for a normal format change
Choose LocalFlux → Convert when you want to decide the output format in the app. The Explorer command passes the eligible local paths to LocalFlux, which opens a normal conversion queue. In this test, the three selected JPG files arrived together, the output was set to PNG, and the destination summary read Same as source.
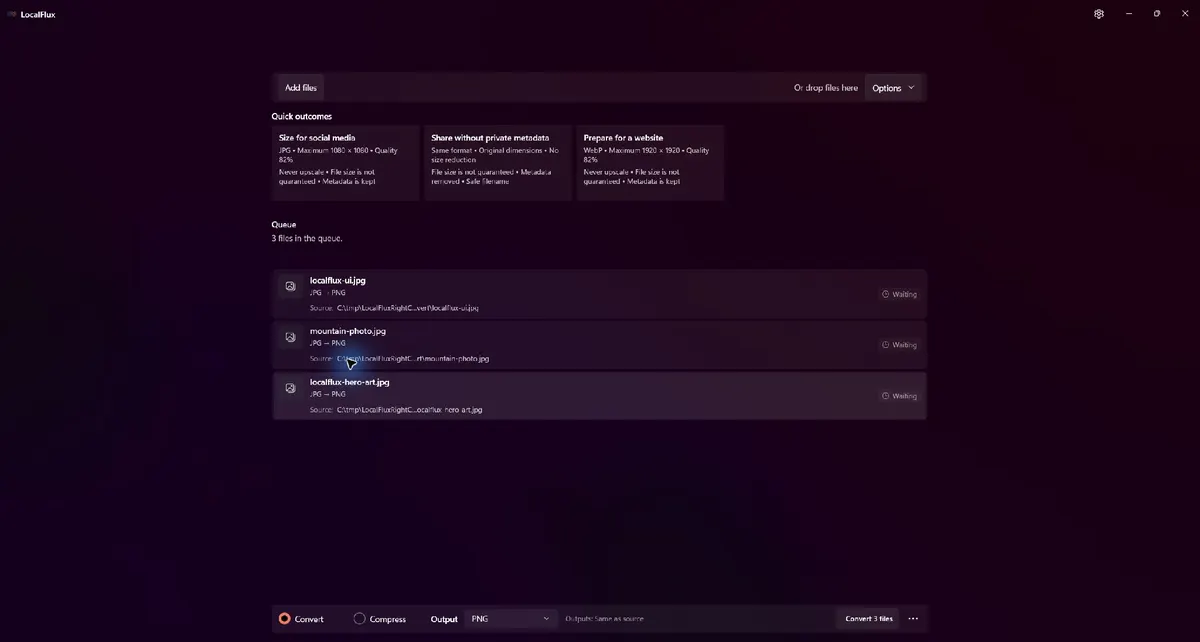
The Explorer selection became a three-file JPG-to-PNG queue. The app still provided a review step before conversion began.
That review step matters. A right-click shortcut should reduce setup, not remove judgment. Before selecting Convert 3 files, check:
- every expected file appears in the queue;
- the route shown on each row is the route you intended;
- the output format is correct;
- the destination says Same as source or another folder you deliberately chose; and
- any resizing, quality, animation, document, or audio options fit the content.
The tested conversion completed all three files and created _converted.png copies beside the JPGs. The originals remained in place. PNG was larger for every fixture: 66.3 KB became 229.8 KB, 123.8 KB became 348 KB, and 268.5 KB became about 1.1 MB.
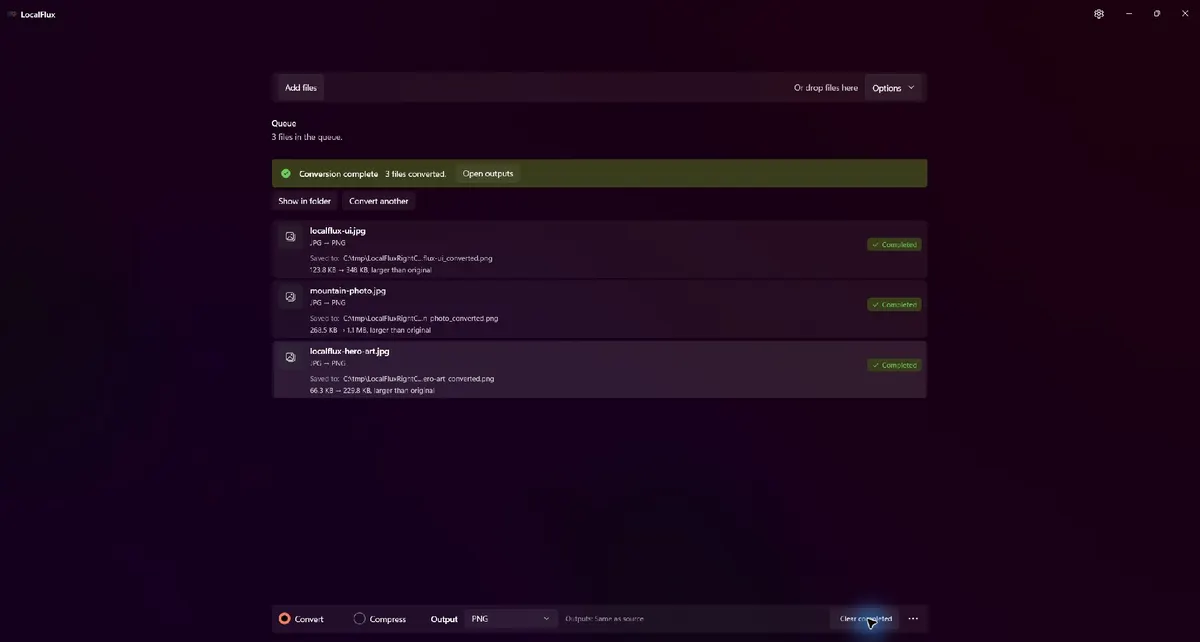
Conversion succeeded, but PNG increased the byte size for these photographic and screenshot-style JPG fixtures. A successful conversion is not automatically a successful compression.
This is an important distinction. PNG is useful for lossless raster storage, transparency, and certain sharp-edged graphics. It is not a universal way to make a JPG smaller. If your goal is lower weight rather than a PNG requirement, use Compress or Convert to WebP, then measure the result.
For route-specific decisions, the formats directory is a better source of truth than guessing from extensions. A supported input format does not imply that every possible output format is valid for it.
Use Compress when the format can stay the same
Choose LocalFlux → Compress when the source format is acceptable and you mainly want a smaller copy. In the tested build, the Explorer command opened the three JPGs in Compress mode with the Balanced (recommended) preset. The interface stated that the original dimensions would be kept and that the final savings would be known after optimization.
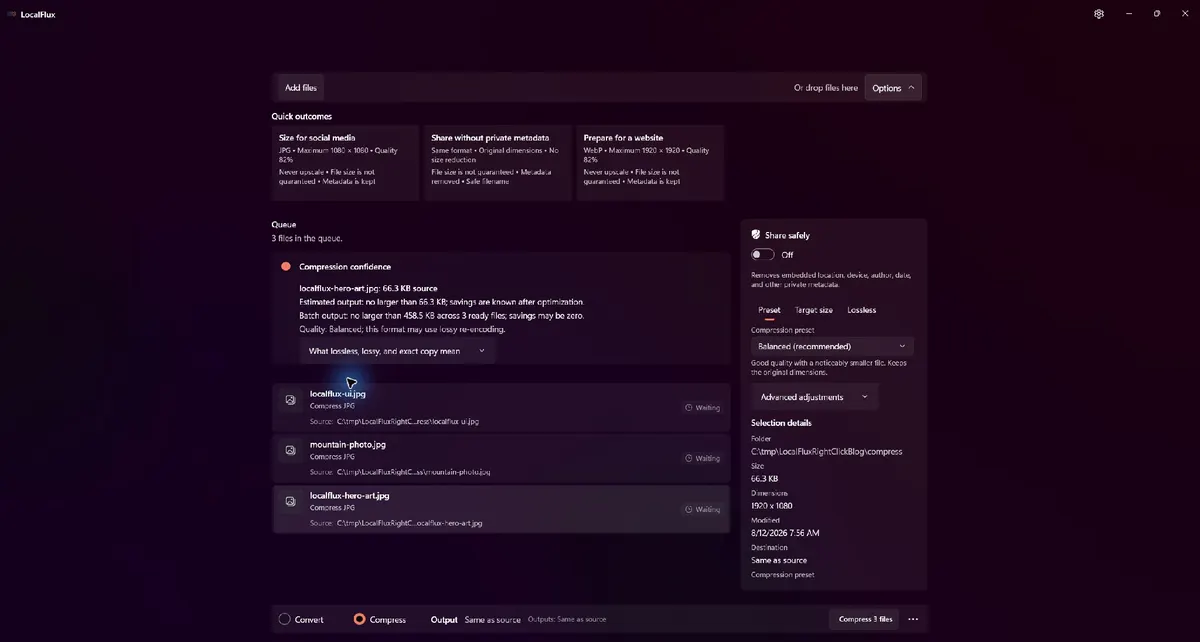
Compress opened with a Balanced preset, a same-as-source destination, and an explicit reminder that savings may be zero.
That warning is honest and useful. Compression depends on the input. A file may already be well optimized, contain content that is difficult to encode efficiently, or require settings that preserve more detail. Never treat the preset name as a guaranteed target size.
The three-file test reduced the combined batch from 458.5 KB to 299.7 KB, saving 158.9 KB, or 35%. The individual results were:
| File | Source | Compressed output | Observed saving |
|---|---|---|---|
localflux-hero-art.jpg | 66.3 KB | 37.7 KB | 43% |
localflux-ui.jpg | 123.8 KB | 87.1 KB | 30% |
mountain-photo.jpg | 268.5 KB | 174.9 KB | 35% |
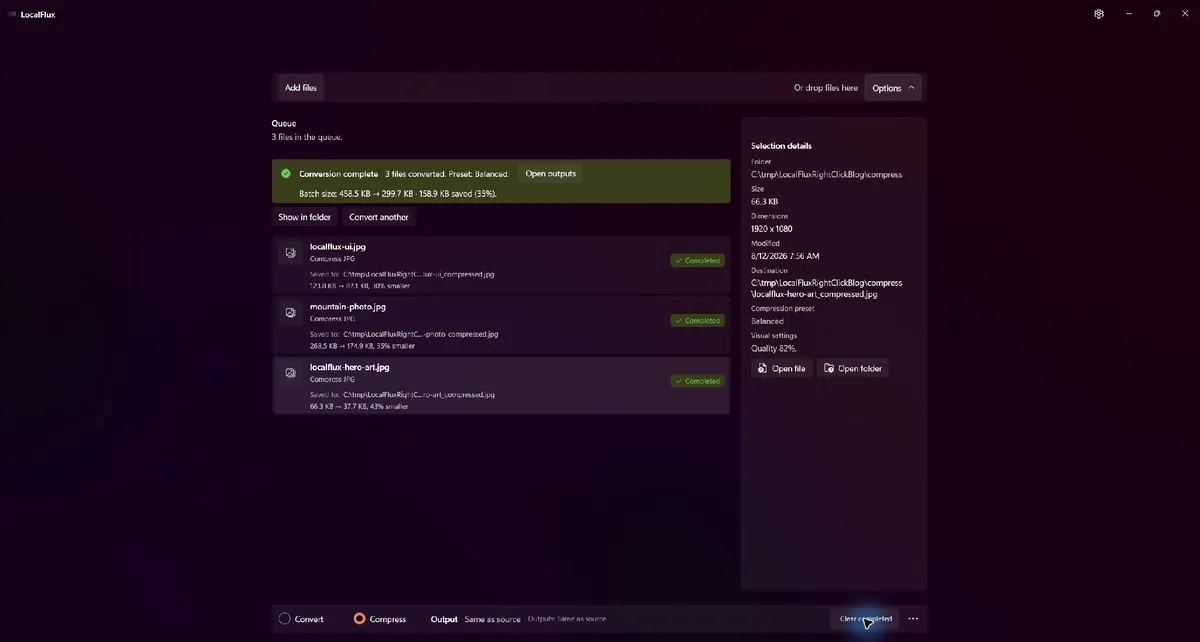
The Balanced preset saved 35% across this batch. The output names ended in _compressed.jpg, and the source files remained unchanged.
After compression, open at least one representative result at 100% zoom. Pay attention to text, faces, hair, foliage, gradients, and hard high-contrast edges. A file-size win is only useful if the output remains appropriate for its destination. For more detail on batch decisions, see how to batch-compress images on Windows. PDF compression has different trade-offs, covered separately in the offline PDF compression guide.
Use Optimize for sharing for privacy-safe copies
Choose LocalFlux → Optimize for sharing when you need a copy intended to leave your device. In this workflow, LocalFlux opened with Share safely enabled, Balanced for sharing (recommended) selected, and Use privacy-safe filenames checked. The interface also stated that the original files would not be changed.
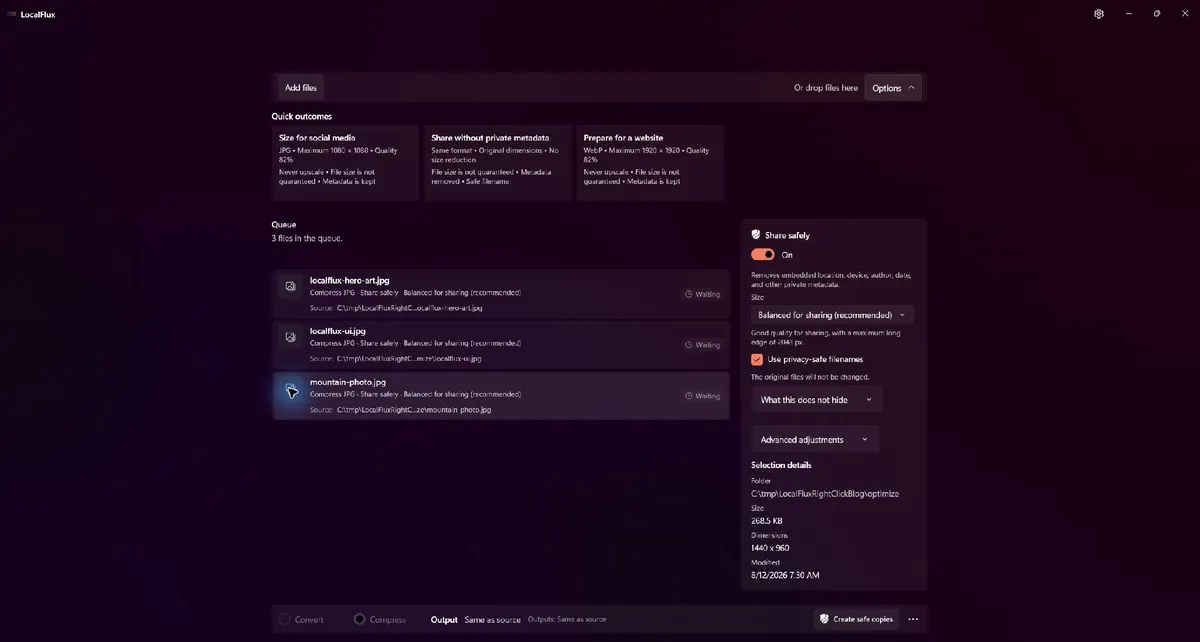
The action prepared compressed JPG copies, enabled private-metadata removal, and replaced descriptive source names with generic numbered filenames.
The completed outputs were shared_image_001.jpg, shared_image_002.jpg, and shared_image_003.jpg. LocalFlux reported that each safe copy was created and verified and that private metadata was removed. The combined batch changed from 458.5 KB to 299.6 KB, again saving about 35% with these fixtures.
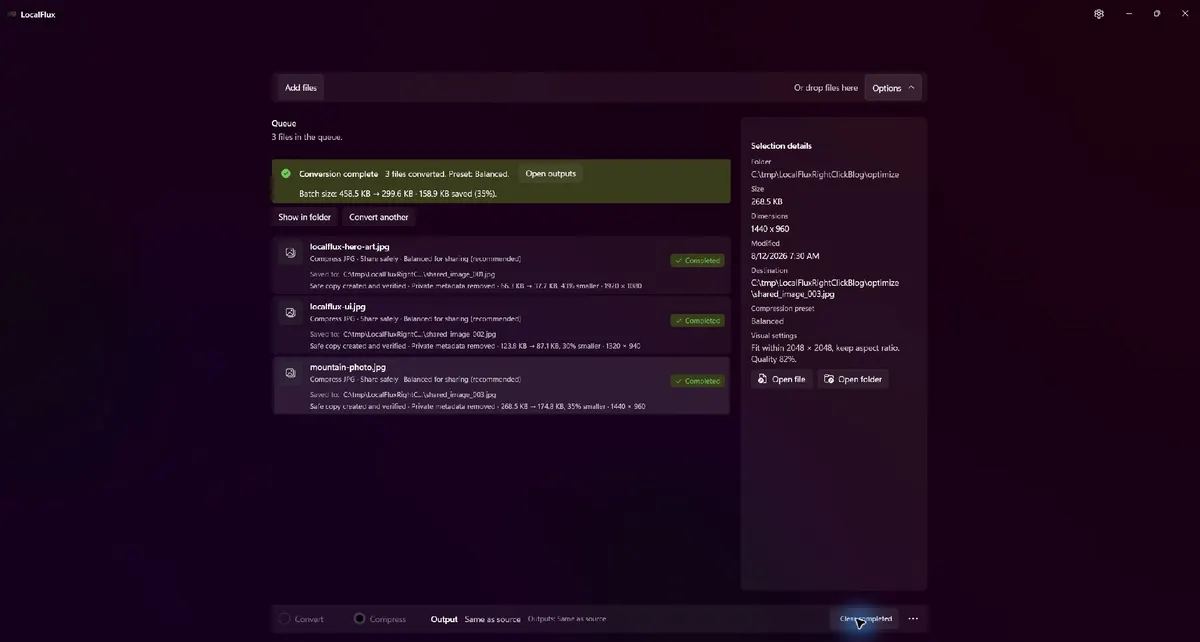
Each completed row confirms that a safe copy was created, verified, and stripped of supported private metadata. The originals remained unchanged.
This action combines several useful safeguards, but it is not anonymity software. Removing embedded location, device, author, and date metadata does not hide what is visible in the pixels. A street sign, face, badge, computer screen, handwritten note, or reflection can still reveal information. It also does not control what a destination website, messaging app, or email service records after you share the file.
Treat the safe copy as a prepared output, then inspect it:
- Open the copy and confirm the visible content is suitable to share.
- Check that the generic filename fits the context; rename it deliberately if recipients need a meaningful label.
- Keep the original in a private location if you need its full quality or metadata later.
- If the image is sensitive, review the limits under What this does not hide before sending it.
The photo metadata removal guide goes deeper into that boundary. You can also read the LocalFlux trust page for the product’s local-processing scope and claim language.
Use Convert to WebP for compatible images
Choose LocalFlux → Convert to WebP when WebP is the intended output. The command is more specific than general Convert: it opens with WebP already selected and admits compatible non-WebP images from the Explorer selection.
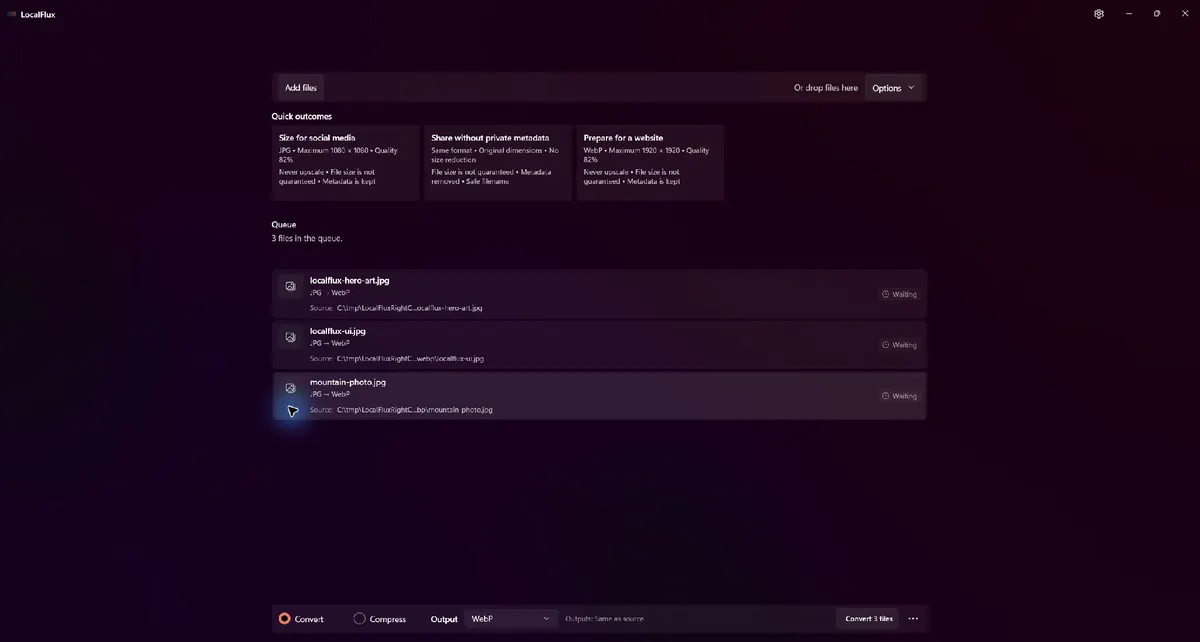
The purpose-built action removes one setup step while keeping the file list, destination, and output format visible for review.
In the three-JPG test, all three files entered the queue and were written beside the sources with _converted.webp filenames. The results were:
| File | JPG source | WebP output | Observed saving |
|---|---|---|---|
localflux-hero-art.jpg | 66.3 KB | 28.2 KB | 57% |
localflux-ui.jpg | 123.8 KB | 63.1 KB | 49% |
mountain-photo.jpg | 268.5 KB | 166 KB | 38% |
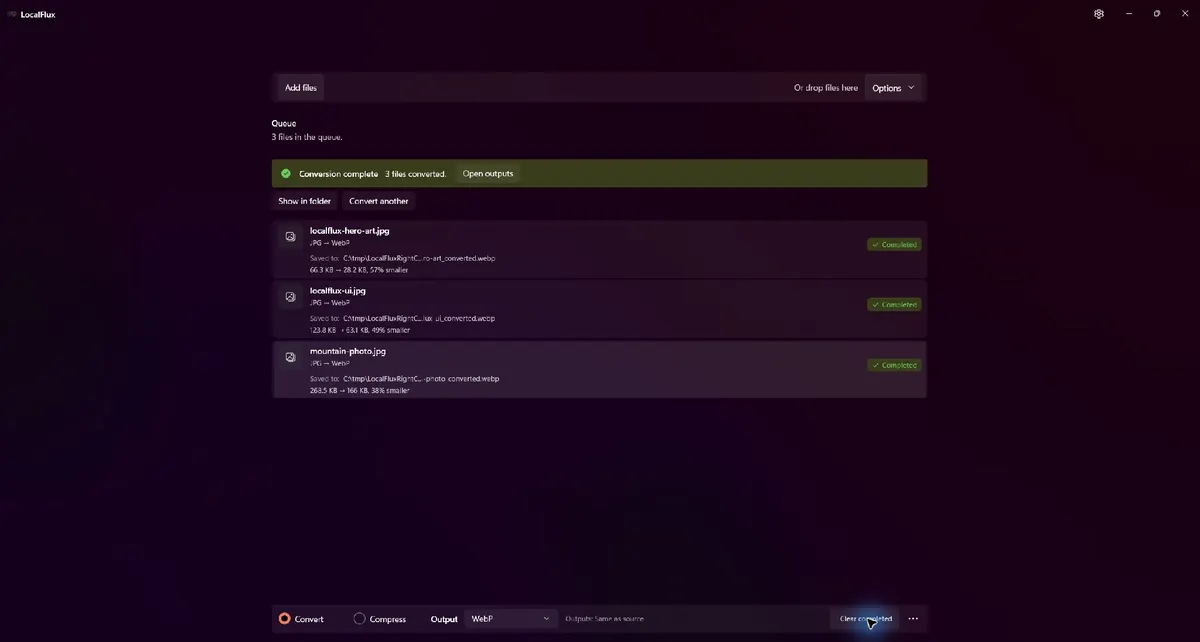
All three JPGs converted to WebP. The observed savings ranged from 38% to 57%, but output quality and bytes still need to be checked for each content set.
WebP is often a useful delivery format for website imagery, but format alone is not an SEO shortcut. Page performance depends on actual bytes, displayed dimensions, responsive variants, caching, request priority, and how the page is built. Keep the source JPGs, compare detailed areas, and publish explicit width and height values. The JPG-to-WebP Windows guide covers that publishing workflow in more depth.
How LocalFlux handles a mixed selection
A context-menu command receives the Explorer selection, but each action still applies its own eligibility rules. That prevents a convenient shortcut from turning into an ambiguous batch.
For this test, File Explorer selected four items together:
- one JPG eligible for WebP conversion;
- one file that was already WebP;
- one WAV audio file; and
- one unsupported ZIP file.
The LocalFlux submenu remained available because the selection contained supported items. After choosing Convert to WebP, however, the app queued only eligible-photo.jpg. The already-WebP image, audio file, and unsupported archive did not enter the WebP queue.
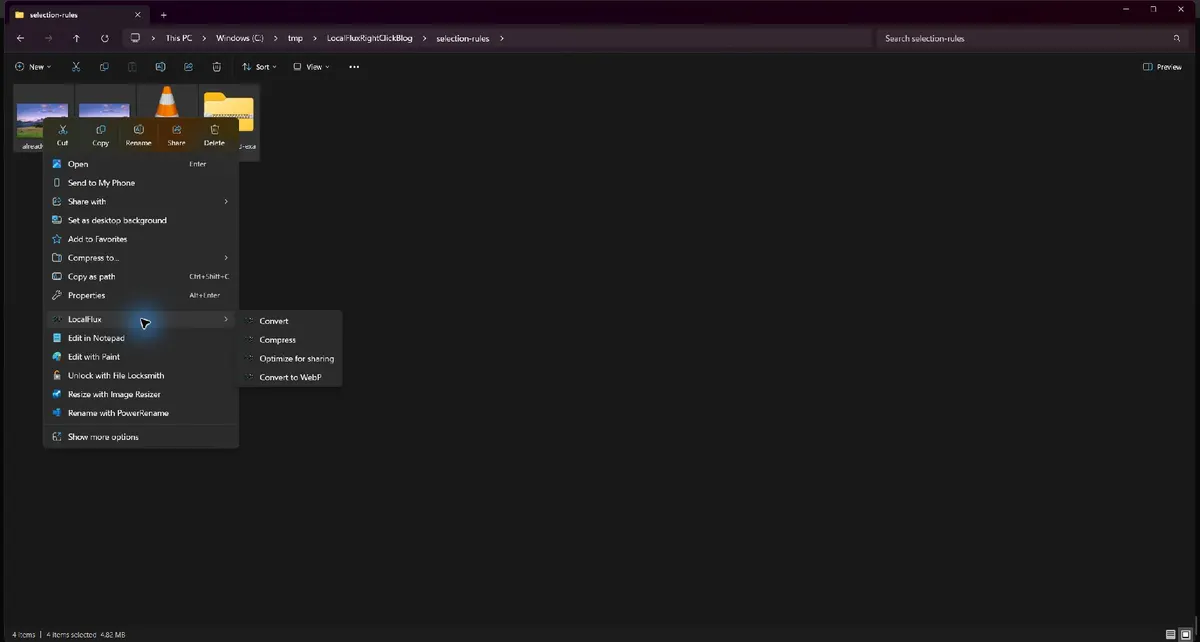
A mixed selection can still show the submenu when at least one item is eligible. The action-specific queue is the final authority on what will be processed.
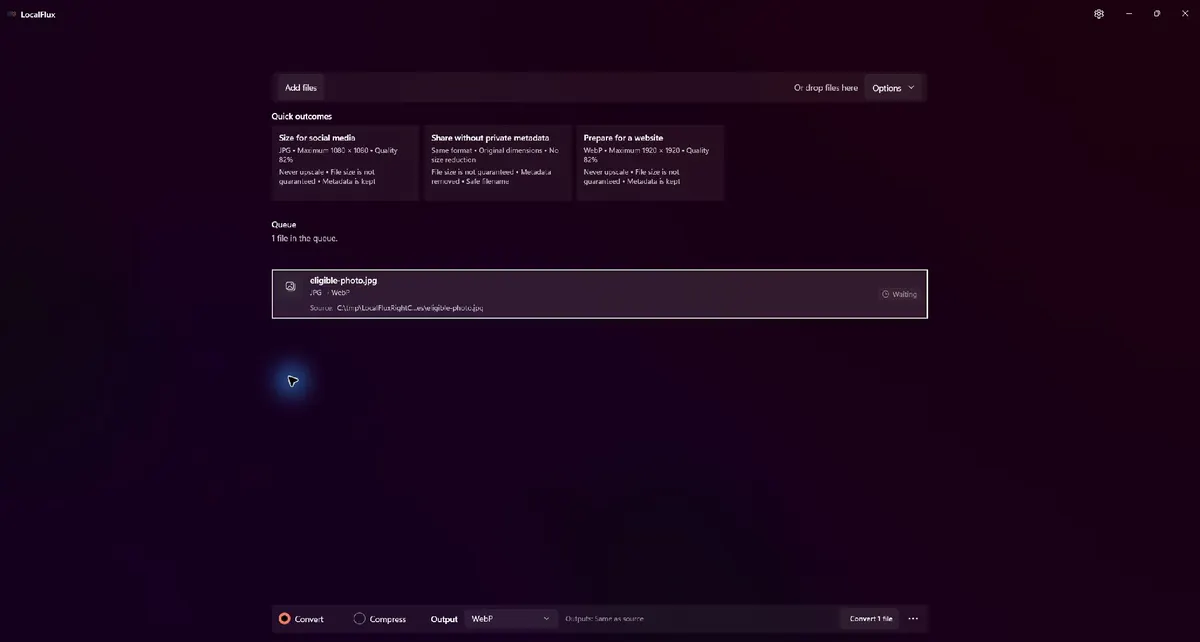
Convert to WebP filtered a four-item Explorer selection down to the one compatible, non-WebP image. No conversion was run during this selection-rule check.
The rule of thumb is to trust the queue, not the blue selection count in Explorer. If you selected 20 items but LocalFlux says 14 files are ready, stop and identify the six that were filtered before continuing.
General Convert and Compress workflows can accept supported files from different families because the app can resolve a compatible route per file. Optimize for sharing needs a coherent sharing workflow and may reject an incompatible mixed-media request rather than quietly applying different privacy behavior across the batch. Split images, audio, video, and documents into separate selections when you want predictable presets and review.
What happens with an unsupported file
When the selection contained only unsupported-example.zip, LocalFlux did not appear in the Windows 11 context menu. The archive stayed untouched; there was no disabled LocalFlux item and no empty app launch.
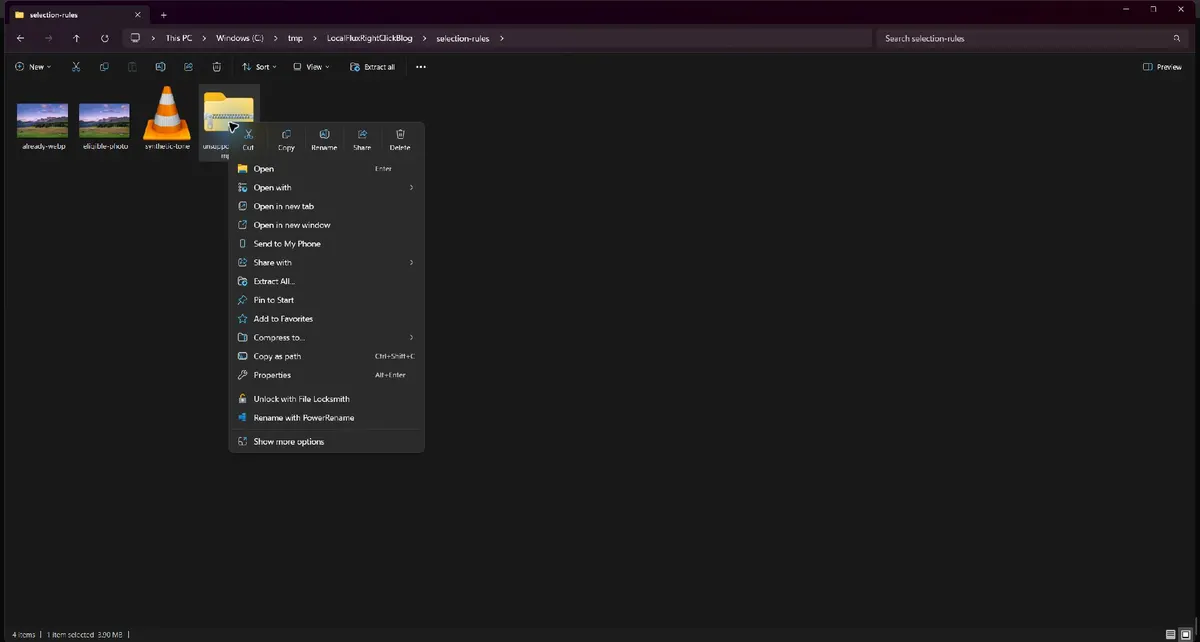
An unsupported-only selection did not show LocalFlux. The modern menu still contained the normal Windows archive actions.
If this happens with a file you expected to work, verify the real extension—File Explorer may hide it in some views—and check the current format list. Also confirm that the item is a local file rather than a placeholder that has not been downloaded by a sync provider.
Where outputs go and what happens to originals
All four tested actions defaulted to Same as source. LocalFlux wrote new files into the selected files’ folder:
- Convert added
_convertedbefore the new extension; - Compress added
_compressedwhile keeping JPG here; - Optimize for sharing used generic
shared_image_###names; and - Convert to WebP added
_converted.webp.
The original JPG hashes were identical before and after every completed workflow. That gives you a recovery path if a setting is wrong, a destination rejects the new format, or you decide the compressed version lost too much detail.
Still, do not use one crowded folder as a permanent asset pipeline. For a large batch, make a working copy or choose a dedicated output location. Separate folders make visual review, upload selection, and cleanup safer. They also reduce the chance of sending both an original and a sanitized copy by mistake.
Does right-click conversion upload files?
The tested Explorer-to-LocalFlux workflow did not involve a browser upload. File Explorer handed local paths to the installed Windows app, LocalFlux processed the fixtures, and the outputs appeared on the local filesystem. That is materially different from an online converter workflow that asks you to submit the file through a web page and download a result.
Keep the claim narrow: this test establishes the behavior of the conversion workflow and the files observed here. It is not a statement that the Windows device, Microsoft Store, operating system, crash reporting, sync software, or every installed component makes no network connections. If the source folder belongs to a cloud-sync client, that client may separately synchronize both source and output files according to its own settings.
For private material, use a genuinely local folder, review the trust documentation, and consider whether Windows backup or third-party sync applies to the directory before starting.
Troubleshooting a missing or unexpected menu
LocalFlux is missing for every supported file
Confirm the packaged app is installed, then restart File Explorer or sign out and back in so Windows reloads the context-menu registration. Reinstalling repeatedly is less useful than first checking whether the shell has refreshed.
LocalFlux appears, but one action queues fewer files
The action filtered the selection. Check the extensions and file families. Convert to WebP accepts compatible non-WebP images, so an existing WebP, an audio file, and an unsupported archive will not be added merely because they were selected beside a JPG.
The converted file is larger
That can be correct. In this test, JPG-to-PNG increased every file. Decide whether the destination format is required. If size is the goal, compare Compress or an appropriate modern delivery format instead.
Compression saved little or nothing
The input may already be optimized. Try a representative file with another appropriate preset, compare quality, and avoid forcing a smaller number at the expense of visible damage.
Outputs are difficult to distinguish from inputs
Use a dedicated destination for large jobs and keep extensions visible. Search by _converted, _compressed, or shared_image_ to review the generated copies.
Which action should you choose?
| Your goal | Start with | Why |
|---|---|---|
| Change the file type | Convert | You can review and choose a compatible output route |
| Reduce bytes without a format requirement | Compress | It exposes compression presets and reports actual savings |
| Send a photo with less embedded private metadata | Optimize for sharing | It creates a verified safe copy and can use a neutral filename |
| Prepare compatible images as WebP | Convert to WebP | WebP is preselected and incompatible items are filtered |
| Process files that need different settings | Separate batches | One clear intent per batch is easier to verify |
The right-click menu is most useful when the selection already represents one job. A folder containing final website photos is a good WebP batch. A mix of invoices, videos, music, photos, and archives is a signal to divide the work first.
Frequently asked questions
Can I convert several files from the right-click menu at once?
Yes. Select the files together, right-click one selected item, and choose a LocalFlux action. The tested batch actions received three JPGs at once. Review the app’s queue because eligibility can reduce the count.
Does LocalFlux replace my originals?
Not in the tested workflows. It created new files beside the originals, and the original hashes remained unchanged. Keep your own backup policy for important assets and verify the destination before a large run.
Why is Convert to WebP missing or filtering a file?
The file must be a compatible image that is not already WebP. An unsupported file, audio file, or existing WebP will not enter the WebP queue.
Why did PNG become larger than JPG?
PNG and JPG use different compression models. Photographic pixels that fit JPG efficiently can require far more bytes in a lossless PNG. Convert to PNG because you need PNG’s properties, not because the extension is expected to shrink every image.
Does Optimize for sharing make an image anonymous?
No. It can remove supported embedded private metadata and use a generic filename, but it cannot hide identifying details visible in the image or control data collected by the service where you share it.
Do I need Show more options?
The tested LocalFlux commands appeared in the modern Windows 11 context menu. Microsoft’s current guidance distinguishes that IExplorerCommand path from legacy extensions inspected through Show more options.
Can I use the workflow without uploading to a converter website?
Yes. This tested path starts in File Explorer and runs in the installed LocalFlux app; it does not require submitting the files through a browser form. Remember that a separately configured sync provider may still synchronize files in its folders.
A faster workflow without giving up review
The value of a right-click converter is not that it makes file decisions invisible. It is that it removes repetitive intake steps while preserving a review screen. Select a coherent batch, choose the closest outcome, confirm the queue, run it, and inspect the outputs. That is quicker than a browser upload loop and safer than a one-click operation that never shows what it accepted.
For the cleanest results, keep originals, split mixed jobs, measure real output bytes, and choose formats based on the destination rather than habit.
Get LocalFlux from the Microsoft Store, browse the supported conversion routes, or continue with the LocalFlux user guide.
Publication evidence
This guide uses rights-cleared fixtures and taskbar-cropped screenshots from LocalFlux 1.0.8.0 x64 on Windows 11. Measurements, original-file hashes, output hashes, captions, alt text, and the limits of the test are retained with the article:
- Test record
- Measurements
- Privacy and rights review
- Media manifest with SHA-256 hashes
- Source and fixture notes
Practical checks before and after conversion
The reliable workflow is to confirm mixed selections are filtered correctly; review the queued action and destination before starting, then verify each new copy. This matters because changing a file extension does not preserve every property of the source. Decide what the destination actually needs, keep the source as the master, and use a small representative file before processing a large batch.
Before you start
- Record the source format and the properties that matter to the destination.
- Choose settings for the intended viewer, editor, device, or upload system.
- Use a new output folder and keep collision-safe names.
- Open the result in the software that will actually receive it.
- Compare content, dimensions or duration, and any metadata you expected to keep or remove.
Review the output
A successful status only confirms that an output was written. It does not prove that every font, frame, channel, page, formula, profile, tag, or accessibility feature survived. For important work, inspect representative outputs and retain the original until the delivered copy has been accepted.